
MyLO - My Learning Online
Echo360 Universal & Browser Capture
Initiating Ad-hoc Recordings in a Lecture Theatre
Information
In recording enabled lecture theatres there is a touch panel. The touch panel has controls on it to initiate an Echo360 recording via Ad hoc control.
This function is supplied for use in the case of emergencies, where a scheduled recording has not been created, or the class has had to relocate with no notice.
Please book recordings in advance via the regular Echo360 recording system available on the HelpHub.
Initiating an Ad hoc recording
Older rooms
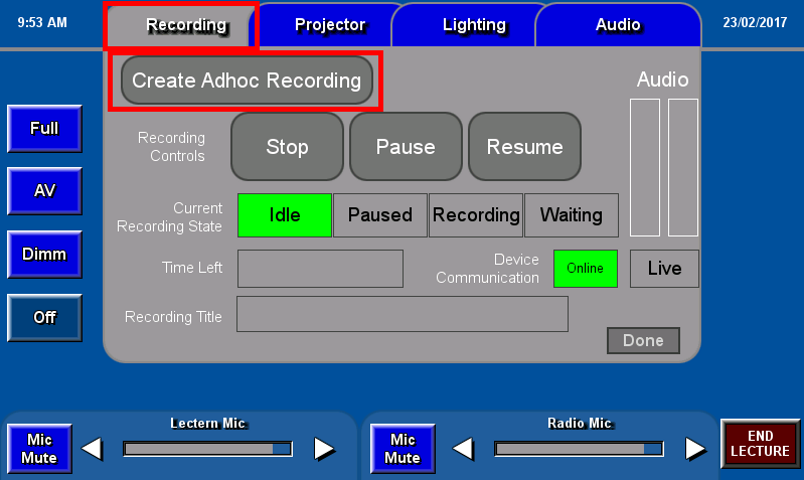
- Tap the Recording tab.
- Tap the Create Adhoc Recording button
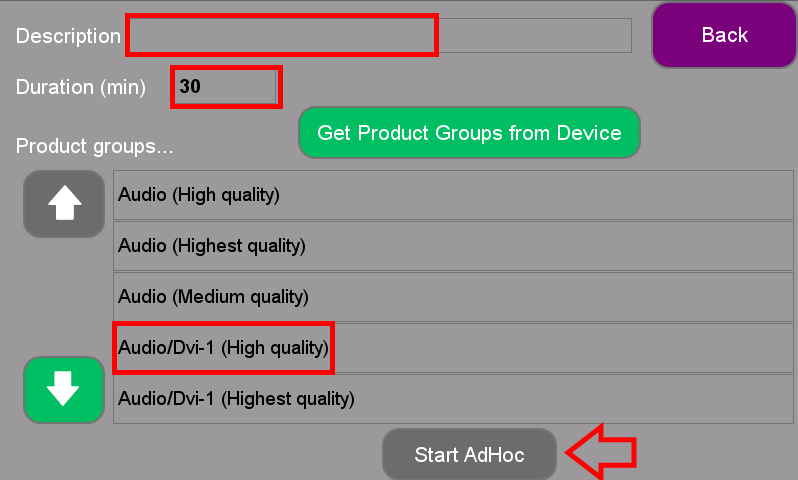
- Fill in a title, choose the duration, select a product group
- Tap Start AdHoc
Newer rooms
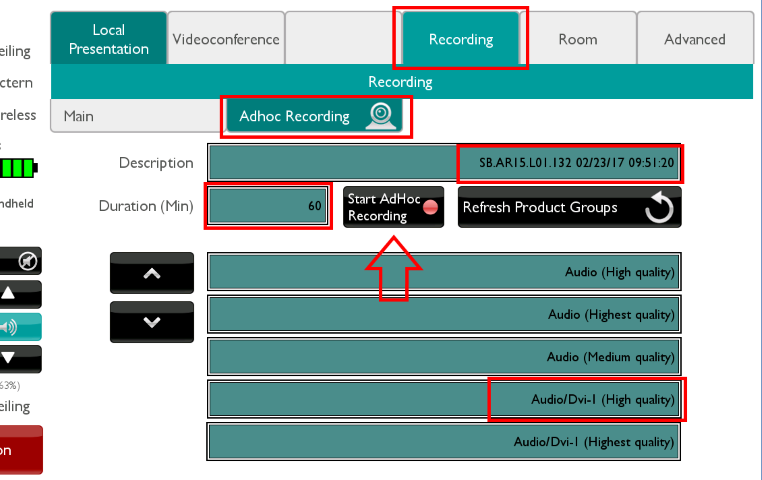
- Tap the Recording tab
- Tap the Adhoc Recording button
- Fill in a title, choose the duration, select a product group
- Tap Start AdHoc Recording
How to choose a product group
Although there are often many product group options, typically you should choose one of the following:
| Audio only (no screen/camera) |
|
| Audio and Single Video (ie: projector content) |
|
| Audio and Dual Video (ie: dual screen rooms, one screen plus camera) |
|
Ad hoc follow up process
Ad-hoc recordings require follow up in order to make them accessible. Please log a job through the Service Portal using the following form Request Support for Learning Management Systems (MyLO) to inform the Application Services group that you have made an ad hoc recording, and provide details of actions required.
For example:
- Ad hoc recording made in Room Name at Date/Time, please upload to my Echo360 Library, or;
- Ad hoc recording made in Room Name at Date/Time, please upload to Unit/Semester.
Information
In recording enabled lecture theatres there is a touch panel. The touch panel has controls on it to initiate a MyMedia recording via Ad hoc control.
This function is supplied for use in the case of emergencies, where a scheduled recording has not been created, or the class has had to relocate with no notice.
Please book recordings in advance via the regular MyMedia recording system available on this webpage.
Initiating an Ad hoc recording
Older rooms
- Tap the Recording tab.
- Tap the Create Adhoc Recording button
- Fill in a title, choose the duration, select a product group
- Tap Start AdHoc


Newer rooms
- Tap the Recording tab
- Tap the Adhoc Recording button
- Fill in a title, choose the duration, select a product group
- Tap Start AdHoc Recording

How to choose a product group
Although there are often many product group options, typically you should choose one of the following:
| Audio only (no screen/camera) |
|
| Audio and Single Video (ie: projector content) |
|
| Audio and Dual Video (ie: dual screen rooms, one screen plus camera) |
|
Ad hoc follow up process
Ad-hoc recordings require follow up in order to make them accessible. Please log a Service Desk ticket to inform the MyLO Support group that you have made an ad hoc recording, and provide details of actions required.
For example:
- Ad hoc recording made in Room Name at Date/Time, please upload to my ALP Library, or;
- Ad hoc recording made in Room Name at Date/Time, please upload to UnitCode/Semester.
How to use Universal Capture - Classroom
Echo360 Classroom Capture software is available in all Echo360 - User Initiated venues. Universal Capture (UC) is a cross-platform, simple capture interface, which creates a consistent easy to use experience across both UC – Classroom and UC - Personal. There is no longer the requirement to use an Echo360 password to access the software – you simply authenticate using your UTAS email address and password.
Important Information:
- Login to the software using your UTAS credentials. If the software opens without the need to login it could already be opened in another users name. Please log out and re open the software if this is the case..
- Please remember to title your recording at the start. If you do not it will make it harder to locate. Once a recording is complete it will automatically upload to your personal library in Echo360 - if untitled you may need to search by date.
- You can also select to publish the recording directly to your Echo360 Course and there is now the ability to livestream your recording.
- Default recording time is one (1) hour - if your recording is to be longer than one (1) hour please remember to extend this by clicking on the + symbol to the right of the stop/pause/cancel buttons.
- When you have finished your recording please remember to PRESS THE SQUARE BUTTON and not the cross. Clicking on the cross will cancel your recording completely and it is unable to be retrieved.
- Please remember to log out of the software when you have completed your recording.
Accessing Universal Capture - Classroom
Classroom Capture is accessed via a shortcut icon located on the desktop of the in-house PC.
Click on the Universal Capture - Classroom icon
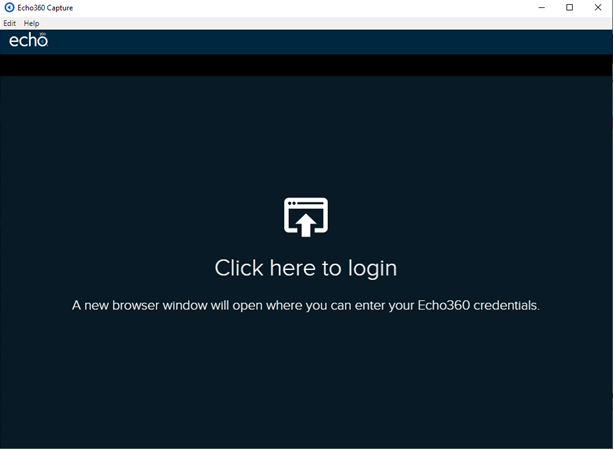
The login screen will then open - Click on Click here to login
If the below appears click on Open Echo360 Capture

Universal Capture - Classroom will verify your credentials
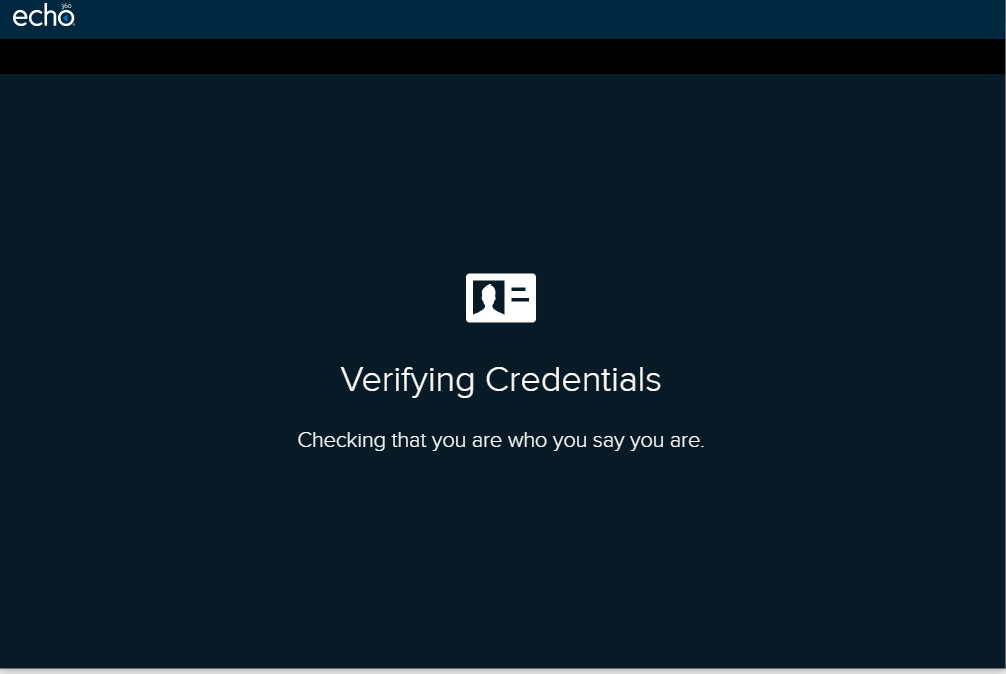
Universal Capture - Classroom will then open ready for you to commence your recording.
Entering Capture Details
Click on Untitled - Library in top left


Title: Enter a title for your recording here
Description: Enter a description for your video here (optional)
Tags: Enter tags to help with sorting content (optional)
Capture Duration (minutes): Enter time required for recording
Quality: Select quality (recommended is High)
Publish to: Choose where you would like to publish your video to. The default location is your personal library, but you can also select a unit to publish directly to.
Livestream: Tick this to livestream your recording. Note: To Livestream a Course and Class or New Class does need to be selected.
When finished click Save.
Recording your Lecture:
Commence your recording by clicking on the red button. Echo360 will give a 5 second countdown and will then disappear to the bottom task bar.
Please note that the recording default is one hour however, this can be extended if required by clicking on the plus icon to the right of the controls (see screen shot below). Please note the options are 30,15,10 and 5 minutes.
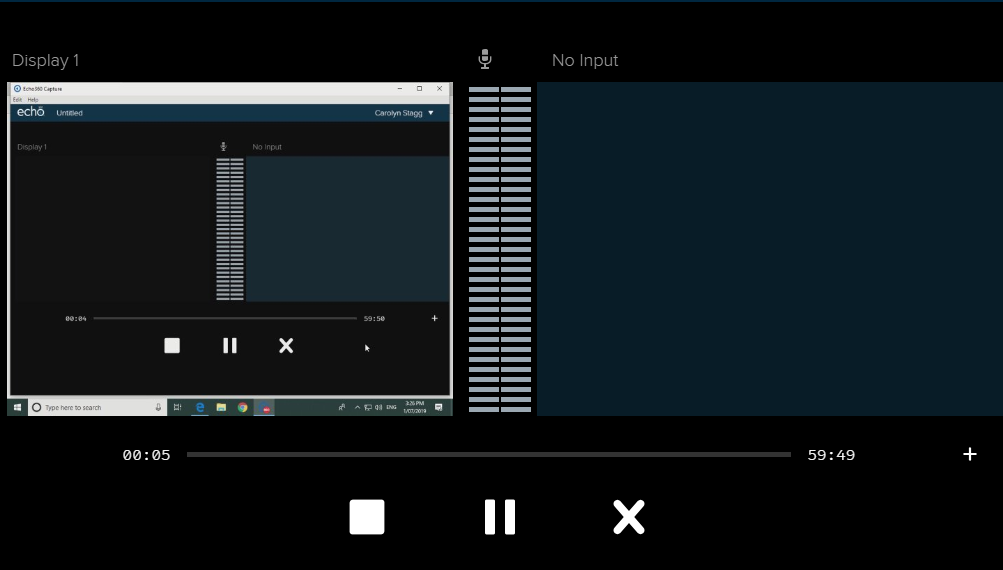
The controls allow you to Stop, Pause and Cancel your recording.
NOTE: Clicking on the cross will cancel your recording. A warning is given if you do click on this however if you proceed the recording will be deleted.

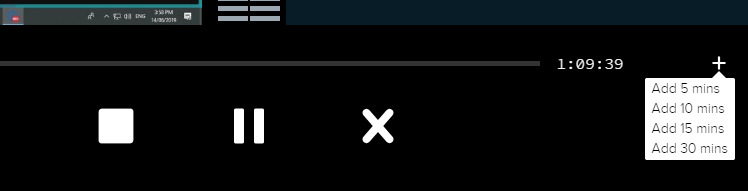 To stop the recording you will need to click on the Echo360 icon on the task bar, this will re open the screen to allow you to stop.
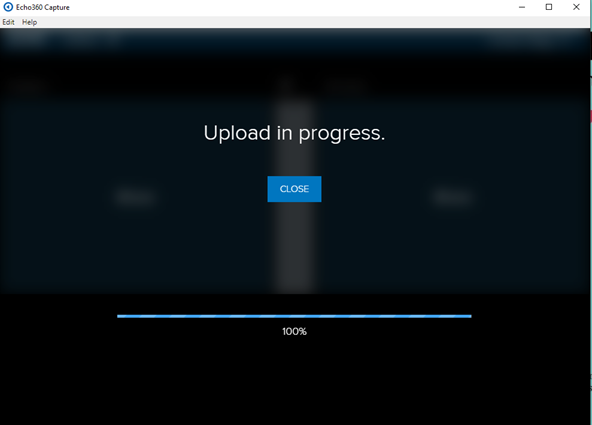
Once you have stopped your recording it will commence uploading to your library or unit.
IMPORTANT: Please be sure to log out of the Universal Capture - Classroom Software when you have finished.
Create Live Stream from UC Personal (Echo360's Desktop Capture)
Live Stream using Universal Capture - Personal
Important information:
- You MUST select a section for the capture; Saving your Capture is disabled when LIVE Streaming is toggled
- You may need to allow a minute or two for the live stream to begin after the recording starts.
- Universal Capture will automatically create a new class in the course/section that you choose.
UC - Personal does not allow you to set a custom Capture Duration, the default live stream length is 4 hours. When you start an ad hoc live stream, the UC will keep recording and streaming until you stop it, you close the application, or the 4 hour limit is reached.
How do I know my recording is live?
- A red LIVE badge will appear in under your name on the software.
- A green LIVE badge will appear next to the new class in the class List.
Initiating a Live Stream
1. Launch Universal Capture - Personal
2. Log in (if not already authenticated)
3. Click Edit capture details

- 1) Title: Give your presentation a title (you can also add a description and tags if you wish)
- 2) Quality: Select a quality for the capture as desired
- 3) Publish to: Select your unit from the dropdown.
- 4) Live Stream: Check the Live Stream checkbox
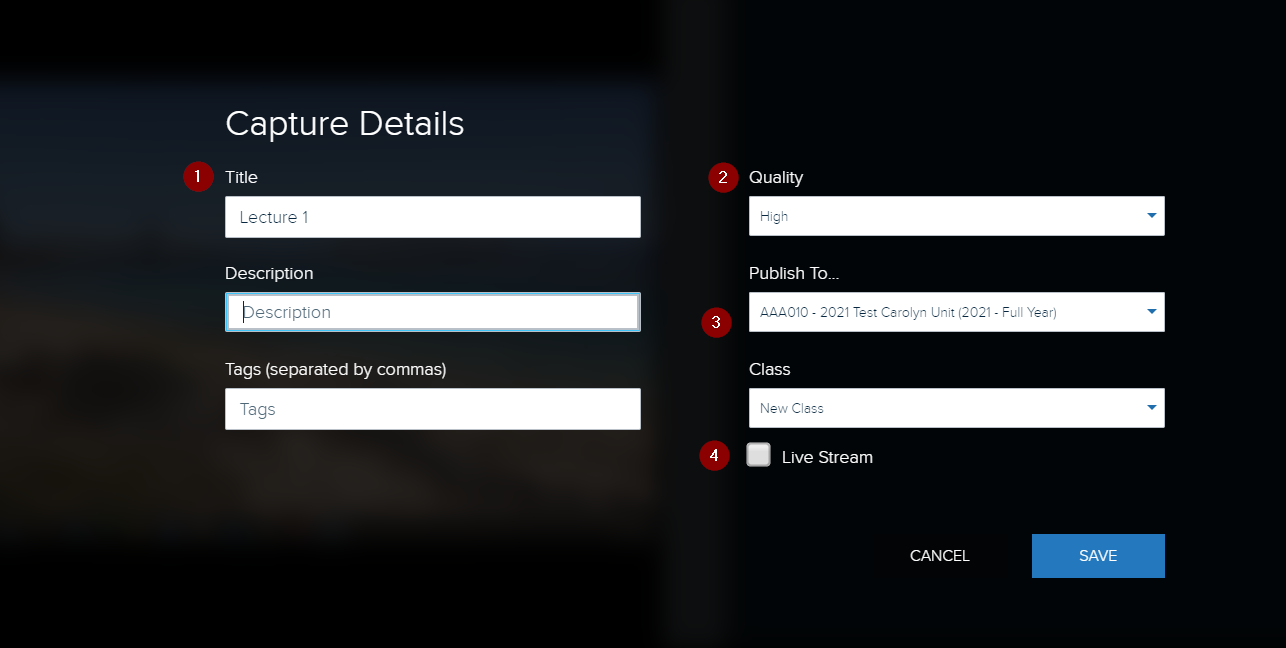
4. Click SAVE to return to the Preview screen.
5. Select Inputs: From the dropdown arrows, select the sources you wish to record.
- 1) Display
- 2) Audio
- 3) Second display or video (if required)
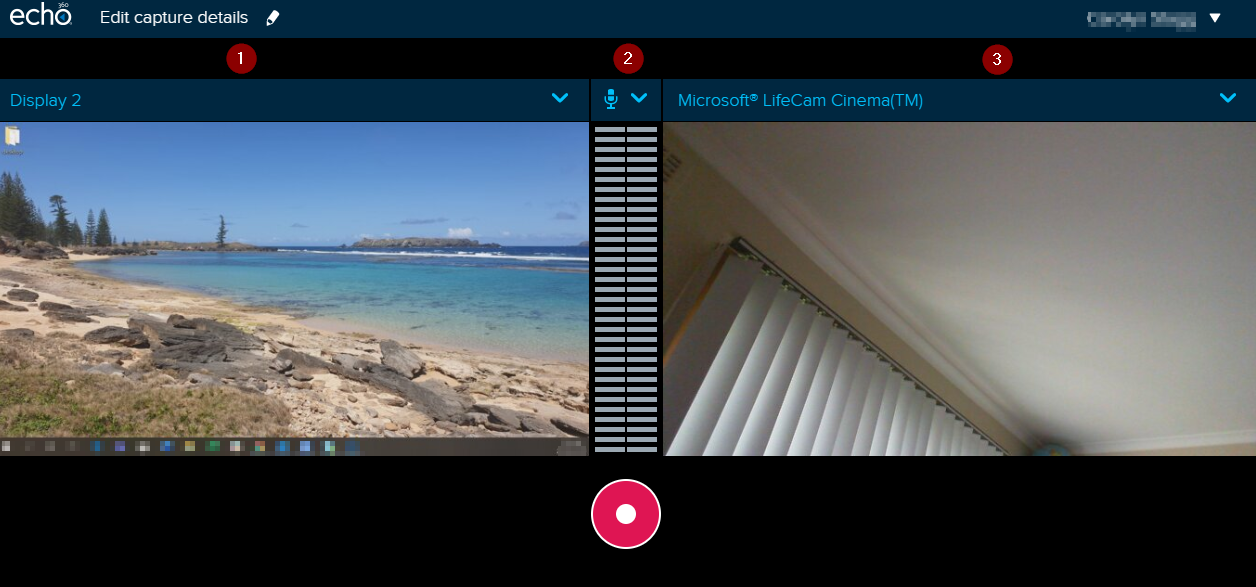
6. Click Record. Please note that it can take up to 3 minutes for your Live Stream to be available for your students.
How do students view Live Streams?
Students can access Live Captures by the Class List which is accessed via the Echo360 Recordings (ALP) link in your unit.

Who is watching the Live Stream?
You can click into your class (shown above) and see who is attending (limited to display only 100 attendees).

Note: Please don't watch the stream yourself - it will cause an audio loop that will likely be unpleasant for all involved!
Working Offline Using Universal Capture - Personal
Using Universal Capture - Personal in Offline Mode
The Universal Capture - Personal desktop application provides the ability for people to choose to work offline. You might want to consider working offline to prevent automatic publishing of a capture right after recording or avoid using your data plan to record and publish.
- Working Offline means that I never want UC to attempt to connect to the internet, regardless of whether or not it can.
Working Online means that I want UC to attempt to connect to the internet whenever it detects a valid internet connection.
How is Working Offline different from being offline due to not having an internet connection?
- To see the option to work offline, you first need to connect to the internet and log in to Universal Capture - Personal. From this point on, you can choose to work offline at any time when not actively capturing, regardless of internet connectivity.
If you are simply not connected to the internet, you can start recording without logging in.
- When working offline, the application will not attempt to upload any recordings until you manually switch to working online again (or log out).
If you are working online but not connected to the internet, UC will automatically attempt to upload recordings in the background as soon as there is a valid connection.
- When working offline, the only publishing location available will be your Library.
If you are working online but not connected to the internet, you will see a cached list of your available sections as publishing options.
Switch between working Offline or Working Online:
- Launch Universal Capture.
- Click into the Universal Capture menu:
- Echo360 Capture on a Mac.
- Help on a Windows machine.
- Click Work Offline or Work Online.
You will know that you are working offline when you see the Working Offline indicator in the bottom right hand corner of Universal Capture - Personal.
Please note that if you are working online, but have no internet connection, you will see "Not Connected" instead of "Working Offline".
For further information please see https://support.echo360.com/hc/en-us/articles/11077557476237-EchoVideo-Working-Offline-with-UC-Personal
Echo360 Browser Capture
Echo360 now provides web or "browser-based" capture, a simplified method of creating a recording using any computer. Browser-based capture can be run on any computer that supports browser use including netbooks, but currently must be run on Chrome.
The requirements for using in-browser capture are:
- You must be online and be in Echo360.
- You must allow access to your computer's camera and microphone when requested.
- You must NOT be using an Incognito window. While in-browser capture may work in incognito mode, if other tabs or browsers are also using it, there may be conflicts that Echo360 cannot provide warnings for through an incognito browser window.
- You MUST be using Chrome (either on Windows or Mac).
To launch in-browser recording
- Enter Echo360 the way you normally do.
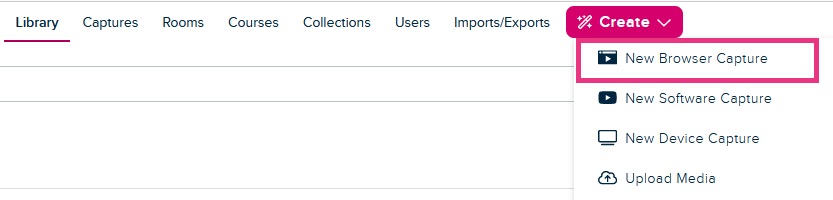
- Click the Create button in the main navigation bar at the top of the screen.
- Select New Browser Capture. This will open in a new tab.
- Your browser will pop up a message asking for permission to access the computer's camera and microphone. Click Allow

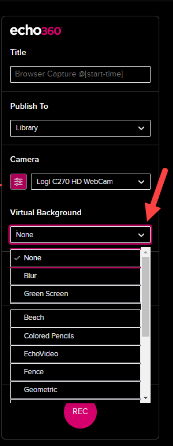
- Give the recording a Title
- Publish To: You can publish directly to your own library or to a section . To locate a section just start typing the unit code in the Publish To box.
- Select the Camera, Screen, Microphone inputs that you require. Further information is below regarding input types.
- Click the Camera Options button to open the Virtual Backgrounds drop-down
- Click the Record button. This will give a 3 second countdown.
- When you are finished recording, click the Stop button (the square), from the control options. Your other control options include a pause button to pause recording, and an X or cancel button, which cancels recording entirely and discards (permanently) anything recorded to that point. You will see a warning message if you select to cancel.
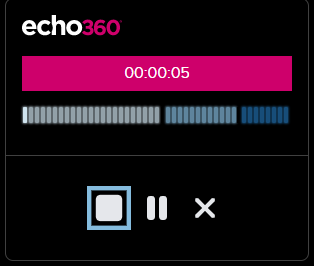
- The recording immediately stops and begins uploading to your chosen destination.
- When you are finished using the browser capture application, close the tab to exit.
Allowing Access to Camera and Microphone
In the event that your browser does not present you with a popup for camera/microphone access, OR like many people, out of habit you race to the Block button, click the Lock icon located on the left side of the URL address bar, as shown below. The drop-down box that appears should provide options for the camera and microphone that you can enable if necessary.

Recording inputs and options
Camera input
If your computer does not have a built-in camera or an externally attached (USB or other) camera, you can skip this section. Leave the Camera setting at None and move on.
Most laptops, however, do come with a built-in camera, and you may have an external camera attached.
Use the Camera drop-down list to select the camera input you want to use. A preview of what the camera will record appears on the screen.
Screen input
The screen input option lets you determine what, if any, display items you want to include in your recording. Click Add Screen on the right, and a dialog box appears with three options, shown and described below.
- Entire screen - The Entire Screen option allows you to select a display screen and record everything that occurs on the screen during the recording. If you happen to have multiple monitors, you can select WHICH monitor's screen to use for the recording. Remember that EVERYTHING on the screen will be captured in the recording if you select this option.
- Window - The Window option allows you to select a particular application window and record everything that occurs within that application window. The application must already be open on the computer so that the Browser Capture program knows it is available to select. If necessary, minimize the browser you are using for in-browser capture, then find and open the application you want.
- Chrome Tab - This option allows you to select a tab of the browser in which you have in-browser capture running, in order to record all activity that occurs in that tab. The tab you want to use must already be open in order to select it.
You cannot select a tab from a different browser; you can only use currently open tabs for the browser where the in-browser capture application is running. If you need to use a different browser, open that browser and use the Window option described above. When you select a tab, a preview of the contents of the tab appears in the Screen share selection pop-up
Microphone
The Microphone recording options include both a drop-down list with sound input options available as well as a sound level bar located immediately above the drop-down list.
As you make different selections, you can speak or make other noises to ensure that the selected input is working and is able to discern the sound.
Using Browser Capture in Easy Embed
It is now possible to create and embed a recording 'on the fly' within your unit using the web browser based video recording application - Echo360 Browser Capture or Universal Capture - Personal.
To create, record and embed a video into a content window

- Log in to MyLO.
- Open the Unit in MyLO where you want to post the video.
- Add an announcement, module, discussion post or other content item where you want to add the video.
- Click the Insert Stuff button in the red boxes above.
- If necessary, scroll through the Insert Stuff list to find the Echo360 plugin. It is clearly named Echo360. Click on this.
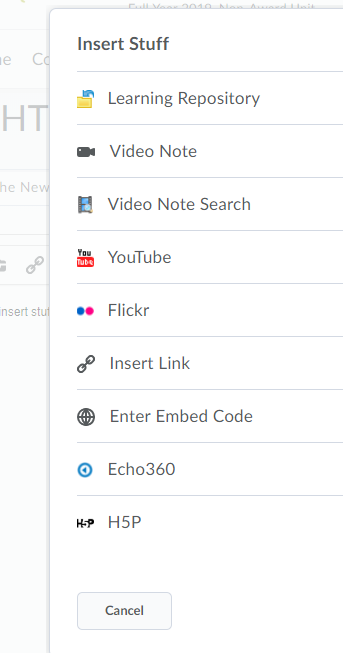
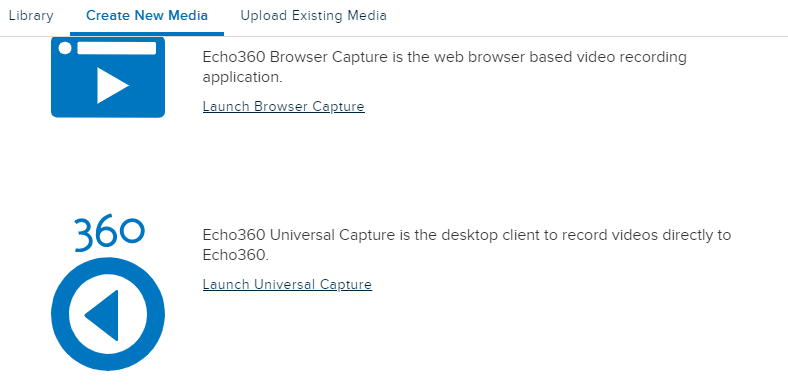
- Click on Create new Media
- Select Launch Browser Capture or Launch Universal Capture
- Launch Browser Capture will open in a new Browser
- Launch Universal Capture will open the desktop software
Once you have completed your recording and it says Complete you can close the tab.
- Click on Library
- Select the recording that you have just done
- Click Next and then Insert
Your recording will now be embedded into the content page in your unit.
How to use Universal Capture - Personal
If you have administration rights on your device the software can be downloaded directly from https://echo360.net.au/downloads
Requirements to run Universal Capture - Personal
Windows requirement:
- Windows 10 (64 bit) or higher
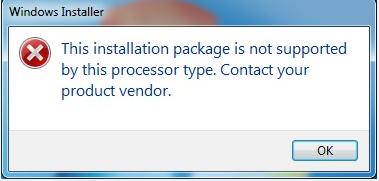
Universal Capture is only supported for use with the 64-bit version of Windows 10. If you attempt to install Universal Capture on a 32-bit system you will encounter the following error
How to Download Universal Capture - Personal
PC Users:
- Echo360 Universal Capture - Personal can be download from the Software Centre for Windows.
- Click on the windows icon (start button) in bottom left hand corner of screen - This will open the Applications page.
- Click on the blue icon titled Software Centre.
- UNI-Echo360 Universal Capture will appear in the list of Applications.
- Click on UNI-Echo360 Universal Capture icon.
Please read the information shown prior to installing.
Click on Install.
-------------------------------------------------------------------------------------------------------------------------------------------------------------------
MAC Requirements:
Universal Capture for the Mac has been updated to support Big Sur (macOS 11.0).
NOTE: Big Sur requires Administrators to allow applications to capture the Desktop
How to allow access to inputs in macOS
Minimum requirement for macOS is Version 10.14 (Mojave)
Mac users:
- Echo360 Universal Capture - Personal can be download from the Mac Self-Service area.
- Click on the rocket icon called the Launch pad
- Locate the icon titled Self Service
- You may need to sign in
- Echo360 app will be shown on the left hand side
Please read the information shown prior to installing.
Click on Install.
A short instructional video is available here
Using Universal Capture - Personal
The most efficient approach is to use Echo360 Online to both record and host the video. This guide takes you through the steps for this, and then for presenting the video within MyLO.
Echo360 Online
- Open Echo360 Universal Capture - Personal
- Set up the microphone, display, and webcam as you require
- Click on Edit capture details and enter a Title for the video and where you wish to publish to - note if you do not select a unit your recording will automatically publish to your Echo360 library.
- Click Record
- After a five-second countdown it will start recording from every input you specified above and will minimise to your toolbar.
- Once you have finished your recording open the software from the toolbar
- Press the Stop button (
 ) - Upload in Progress will show
 - Recording will now be added to library and your unit, if selected.
- Your personal library
- Do not delete recordings from your Library if you have them in a unit as this will remove them from there also.
- You can store videos here to be used in a unit at a later date
- Your recordings will remain in your library even if you publish to a unit.
- Your personal library
- To then Publish these items into a MyLO unit. This can be set up as shown here: