
MyLO - My Learning Online
Tips & Tricks
Disabling an Echo360 file downloads on a unit
Information
The option for students to download video and audio files from a unit in ALP is controlled by the Instructor for the unit. The setting can be toggled by:
- Access the unit you wish to turn off downloads in, either through your MyLO link or by accessing https://echo360.net.au
- Click the Settings tab in the top right.
- Click Features.
- Toggle the Content Downloads option to turn downloads on or off.
Allowing Other staff to Edit Echo360 Videos
Information
By default only the primary instructor for each unit can edit content. This setting can be toggled by:
- Access the unit you wish to change this setting in, either through your MyLO link or by accessing https://echo360.net.au
- Click the Settings tab in the top right.
- Click Features.
- Toggle the Co-instructors can edit content option to on.
Creating a Video Assignment
Students can now use the Easy Embed feature of Echo360 to embed a video assignment into an HTML editor. This saves the student from having to create a public link to the assignment, copy this link and then share the link in order for you to view their assignment.
D2L and Echo360 now support the lockdown of student-created media used within assignments so they cannot edit or delete content after submission. When selecting to embed in an assignment students will now see a new option under insert stuff - Echo360 Student Submissions. The students need to select this when embedding. This will then lockdown their media. There is no change to what teaching staff currently see or access.
To create a video assignment follow the steps as outlined in this guide how to create an assignment folder
When you get to step five ensure you select Text Submission as the file type for your Video Assignment.
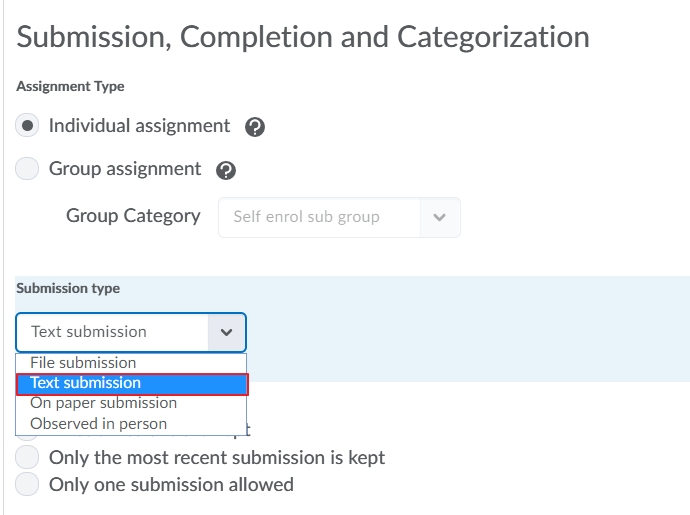
Your students will now be able to share their video recordings into the assignment folder. Instructions for students can be found in this guide: Uploading Video Assignments
Submissions will appear in the Evaluate screen. You can press play to view the recording and mark as per normal.
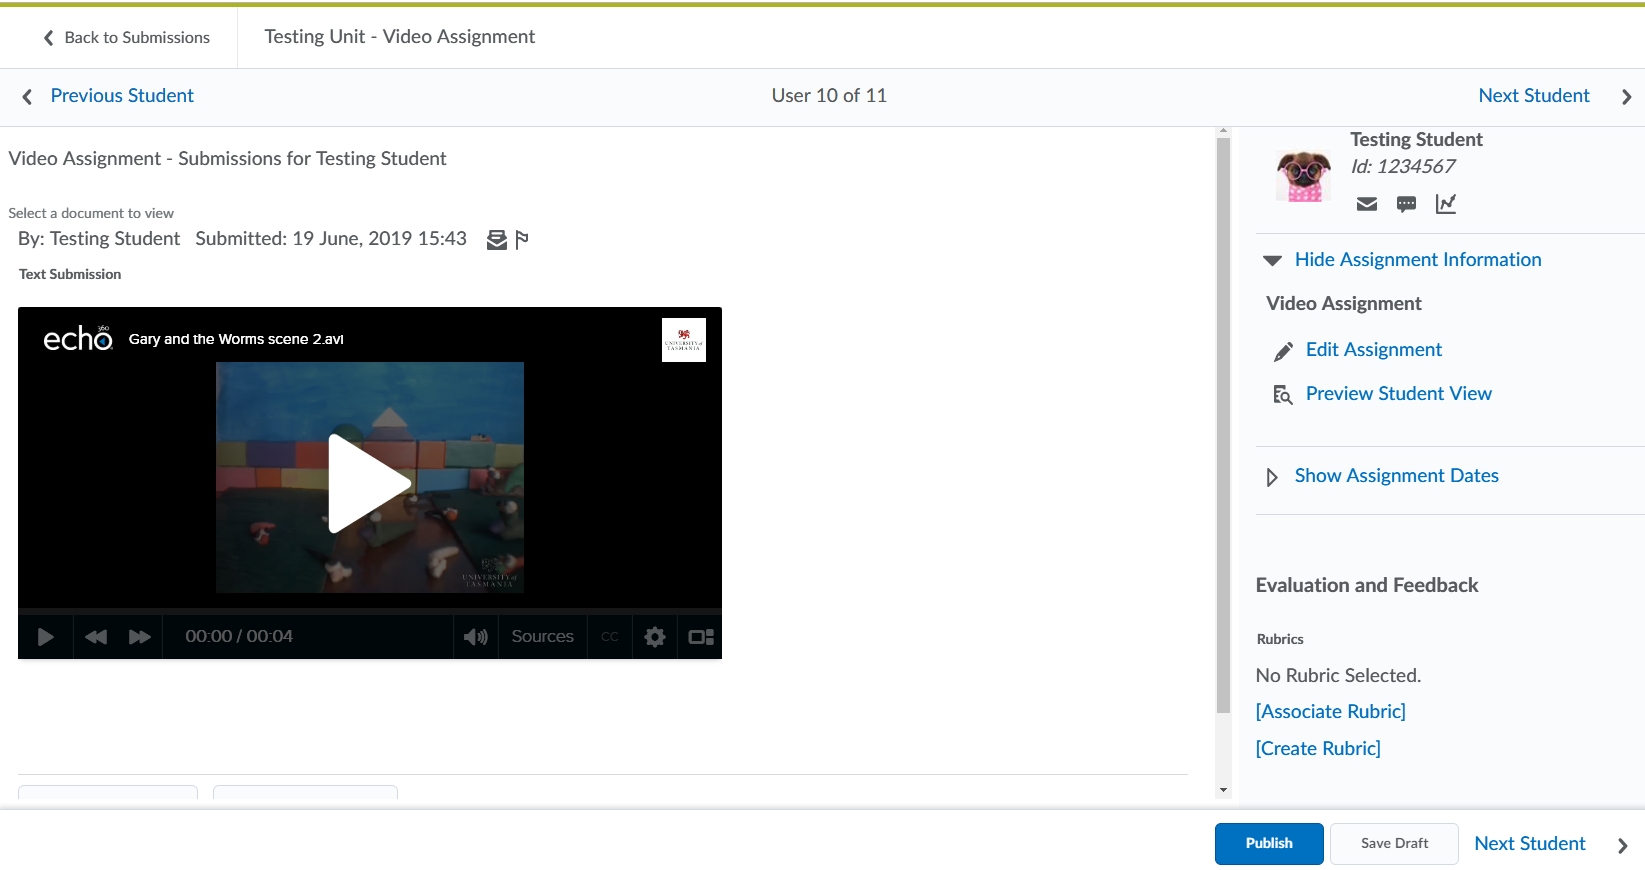
A how to video is also available here to watch.
How to Edit a Video
Echo360 has an inbuilt video editor which can be used to perform top and tailing, splitting of one recording into multiple separate recordings, or removal of multiple unwanted segments in one recording.
Further detailed information is available on the Echo360 support site:
Embedded Polling and Interactive Media
Echo360 now has two additional media types to accompany the video, audio, and presentation types: Polls and Interactive Media.
Echo360 now allows instructors to embed polling questions into videos or audio media. These embedded polls “gate” the media for student viewers, requiring the students to respond to the poll before they can continue viewing.
Instructors can embed interactive media into content windows the same way they embed videos now, through the Echo360 easy embed button.
Embedded Polling and Interactive Media Overview:
Viewing Responses to Embedded Polls in Interactive Media:
Adding Slides or Polls from your Library into a Presentation:
Creating an Image Poll:
ASR - Echo360 Transcripts
ASR Overview
Echo360 has partnered with Amazon to provide transcription services for audio and video media in Echo360. ASR stands for "automatic speech recognition" and is a service provided by Amazon that uses artificial intelligence to translate speech into text and sync the text with the video. ASR will produce written transcripts for any recordings uploaded. It takes at least 30 minutes for a video to receive automatic transcriptions, longer for videos that are more than an hour in length and/or if the transcription service is processing a large number of requests at the time.
Once a transcript has been created for your recording it remains with the recording if it is reused within other units.
As ASR produces machine generated transcripts, they will require editing for accuracy (the same as YouTube, Zoom or other machine generated transcripts).
Academic Senate has approved the use of ASR in all units using Echo360 by the University of Tasmania from Semester 2 2021. It is recommended that Unit Coordinators will edit Echo360 ASR transcripts for accuracy and provide details to their students regarding timing for the edited copy of the transcript to be published.
If Echo360 calculates that an unedited ASR transcript reaches an accuracy threshold of 90% or above (calculated as the sum of all individual word confidence scores/Number of total words in the transcript), the transcript will automatically be pushed to the media's CC track.
How to edit your Transcripts
- Echo360 ASR provides a transcript editor within a playback panel, allowing the following functionality whilst viewing the recording:
- Editing including undo/redo
- Changing speaker tags
- Search & replace
- Exporting/uploading of transcripts if required
- Confidence score slider (will highlight perceived inaccurate words dependent upon the word confidence chosen)
- Version control with multiple edits
- Play, pause & scrub to different locations in the recording/transcript
- Auto pause of the recording, whilst editing the transcript
- If manually edited and compliant for closed captioning (99% accurate and inclusive of sound effects & non-speech elements), transcripts can be uploaded to media as closed captions
- Transcriptions will persist if media is re-used in subsequent semesters or different unit sections
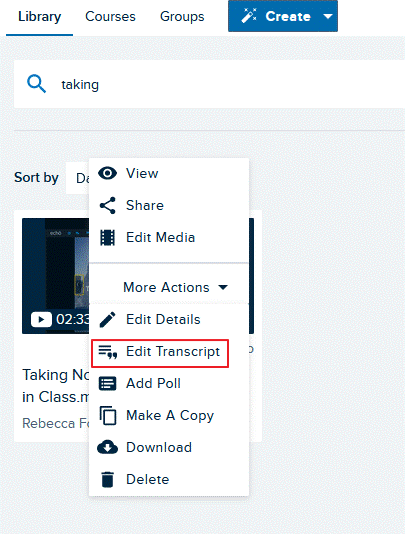
To edit a transcript select Edit Transcript from the drop down menu next to your video from within the Echo360 Section.
This will bring up the editor - it will have your recorded video on the left, with the transcript next to it. Press on Edit Transcript and press play on the video to listen to the recording and edit as needed. 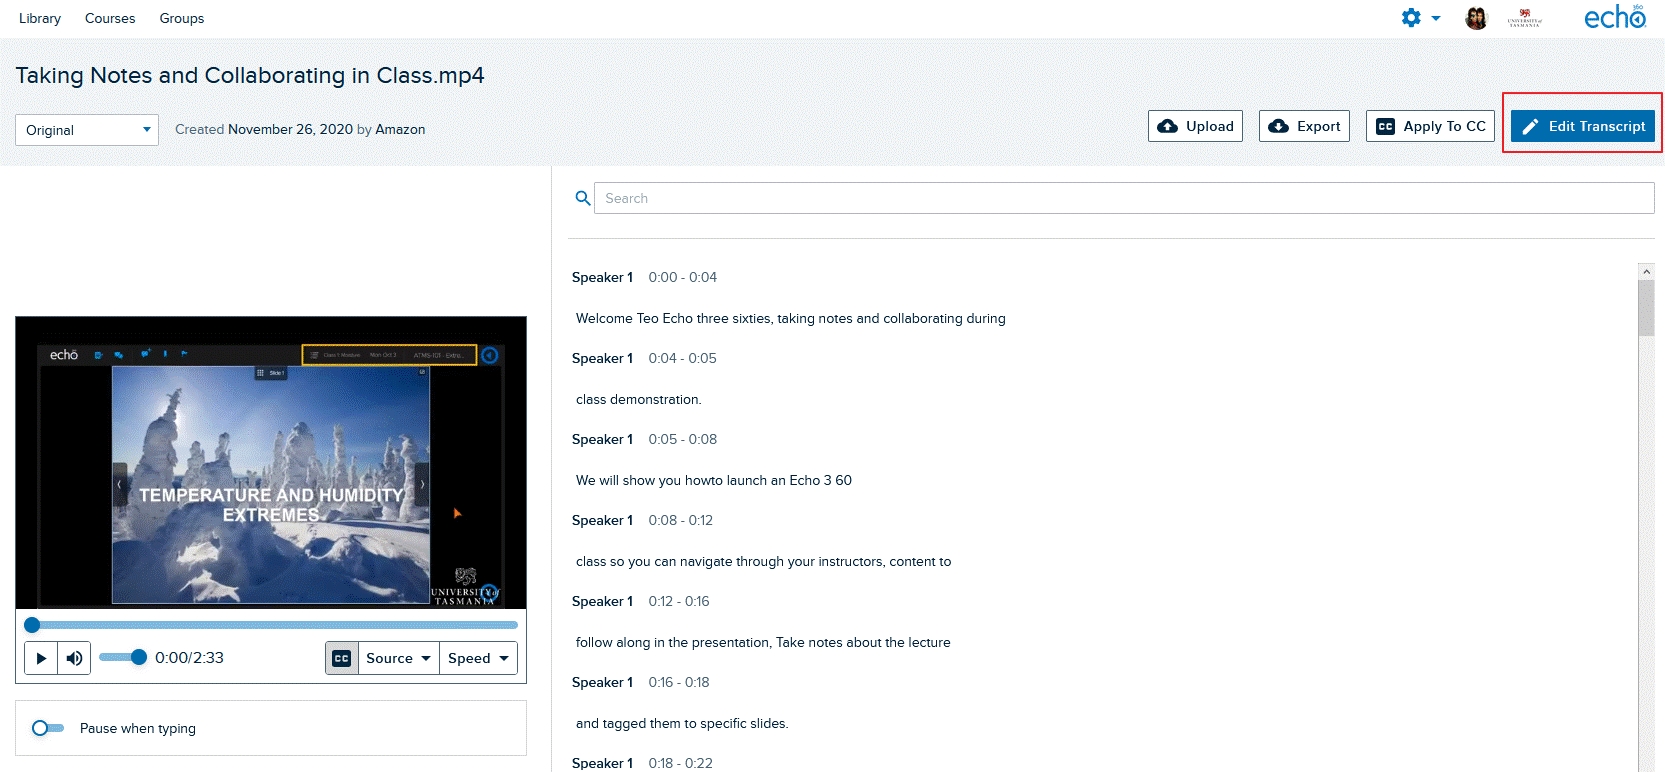
Once your editing is completed you can the save your changes as Version 1
Note:
If ASR has automatically added the transcript to the CC track as the original version has met the 90% threshold, after saving your edits as Version 1 you will then need to click the "Apply To CC" button. This will load the edited version of the transcripts to the CC track
More information on editing your transcripts can be found here: https://support.echo360.com/hc/en-us/articles/11077107047181-EchoVideo-Editing-a-Transcript-using-the-Transcript-Editor
Student view of Transcripts
- Students can access Echo360 ASR transcriptions either via the Echo360 recordings link within MyLO units, or the new Echo360 embedded media player
- They can also toggle on the CC track (if ASR Transcripts have been pushed into it either automatically or manually) and configure the display via the cog icon
- Unedited/edited transcripts are visible for all students in units, unless made unavailable.
- Student functionality includes:
- Video and text automatically synced including play, pause & scrub
- Highlighting text in the transcript will automatically sync the position in the recording
- Search transcripts for key words
- Download transcripts in either WebVTT or Text format
A link to a student guide on how to access transcriptions.
If you are using Zoom Web Conferencing and are pushing these recordings into your Ech360 section, there are some best practices and settings you should put in place for transcripts. Instructions on this are here.
Custom Thumbnail/Preview image for Video and Audio Media
Users can now apply a Custom Thumbnail/Preview image for Video and Audio Media
The thumbnail is what users see on the media tile in the Library or in a Group. The thumbnail is also the preview image that users see prior to playback, for media posted or embedded outside of Echo360.
Echo360 now allows you to select ANY moment from the video to use as the thumbnail and preview image. This can go a long way more easily identify which recording is which, and which one you may want to view, or add to a collection, or post somewhere for students.
Even better, you can upload your own image to use, if using a still from the media isn't appropriate, or there isn't a moment that conveys any useful visual information about the media. The ability to upload a custom image is also useful for Audio-only media, where the default image is a simple “speaker” icon.
Collections
Echo360 Groups are now Collections
In Echo360 Groups have become Collections, a better way to share, organise and collaborate with content in Echo360
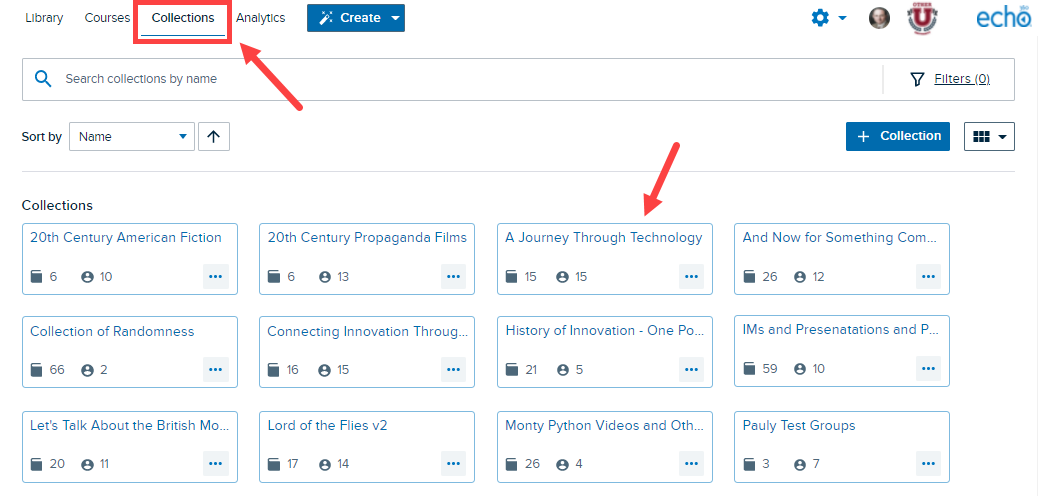
Collections can be used to structure the way recordings are filed within your library, or even better, they can be used to share content across a group of colleagues.
If you wish to share your content within a group of colleagues, Collections has a number of different roles & permissions which can be applied to the group and the media within the Collection
Creating a Collection
If you are an Instructor within Echo360, you now have the ability to create a Collection. You will become the Manager of the Collection
Don't forget to name your Collection.

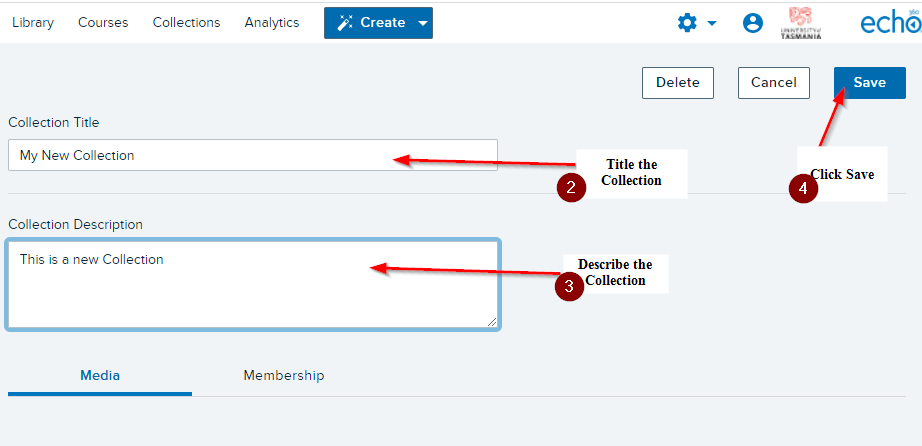
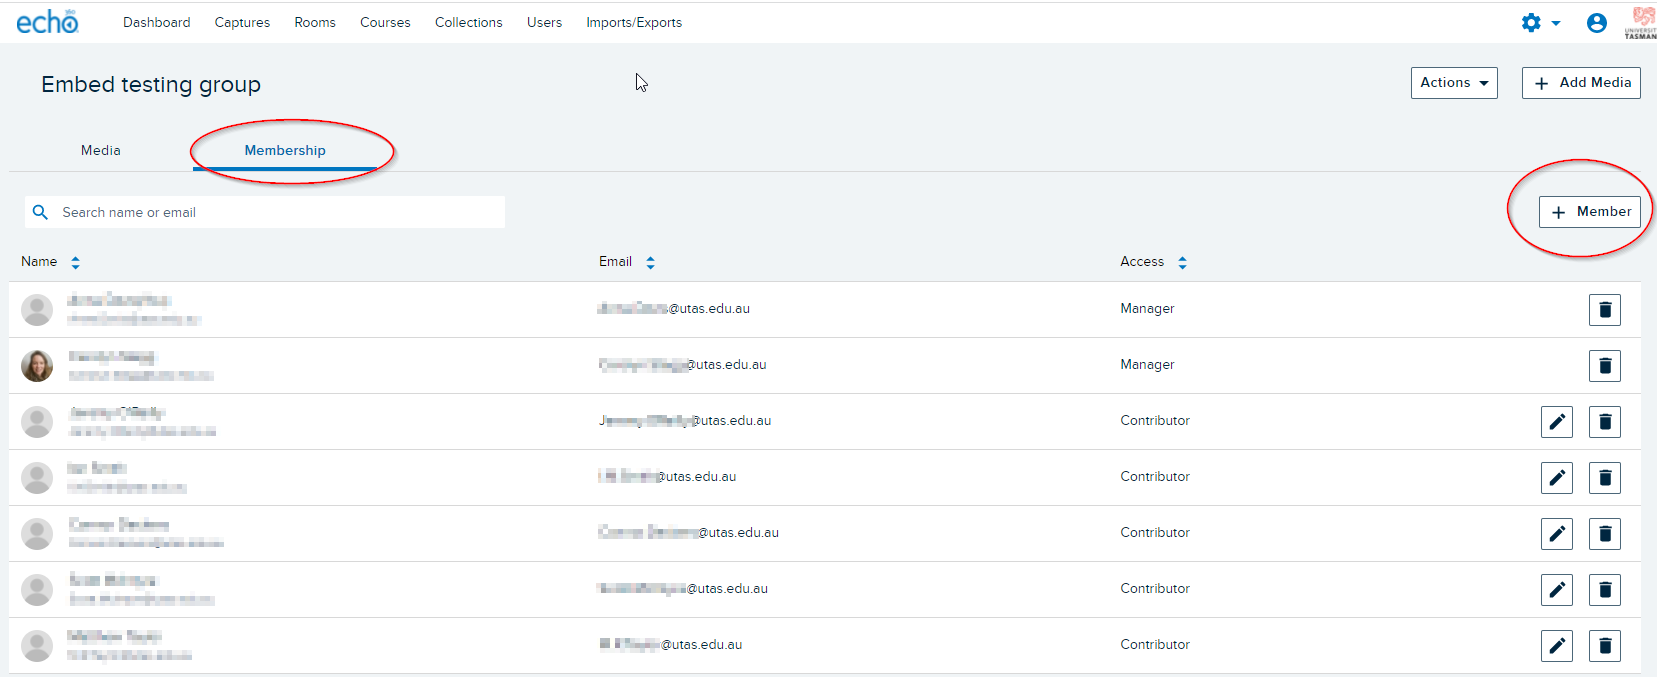
As the Manager of the Collection you will be able to add other participants and assign roles based on the below permissions
If you leave the Collection you will need to assign a new Manager (ITS Application Services can also do this if required)
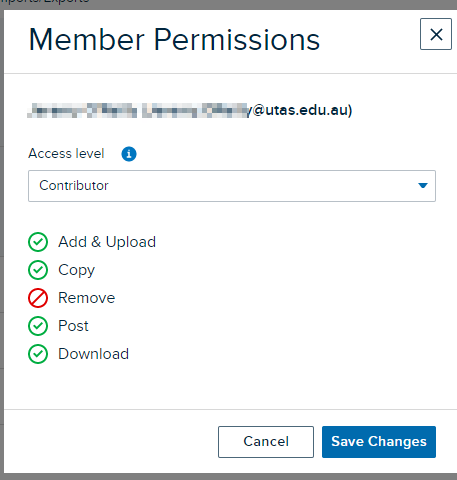
Roles and Permissions in a Collection
| Role | Manage Membership | View | Add & Upload | Remove | Copy Media/Add Polls | Share/Post | Download | Edit Media & Add/Edit Transcripts |
|---|---|---|---|---|---|---|---|---|
| Manager | x | x | x | x | x | x | x | x |
| Reviewer | x | |||||||
| Collaborator | x | x | ||||||
| Contributor | x | x | x | x | x | |||
| Editor | x | x | x | x | x |
A Manager can also:
- Build a custom role to give a member the specific access they require
- Edit Collection details (title and/or description)
- Clone a Collection
- Delete a Collection
A Manager cannot perform the following actions (ITS Application Services can do this for you if required)
- Delete other managers
- Demote another manager to a lesser role
Each member needs to have a current Echo360 account. If you are trying to add someone to a Collection and can't see them, please log a job via the Service Portal and we can create their Echo360 account.
Current Limitations
- To share media to an Echo360 section, you must be an instructor within that section
- All media that is added to a Collection will remain in the owner's library. Removing media from the Collection does not delete from the owners library; it will only remove access to that media from the collection
- If you edit media directly from within a Collection, you will also be editing the original - remember to make a copy first
- You can currently use insert stuff functionality in MyLO to add a recording from a Collection where you have that permission BUT you need to search the name of the recording (Echo360 will soon release functionality so that Collections will appear on a separate tab)
Adding Media to a Collection / Sharing from a Collection
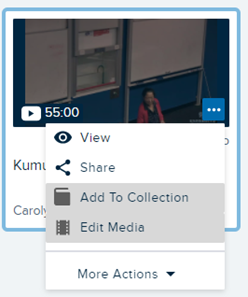
Click on the three dots on the media tile in your library and select add to collection.
To share from the Collection click on the three dots, choose share and choose the appropriate action
(if you do not have permission to add to a collection or share from a collection these will be greyed out)
Echo360 have in depth Collections Help Guides available on their support site
Echo360 Analytics
Echo360 provides an Analytics option in the main menu for Lecturers. The Analytics option opens a "consolidated analytics" interface. It allows you to easily find viewing data for all of your Echo360 unit media in a single, consolidated location.
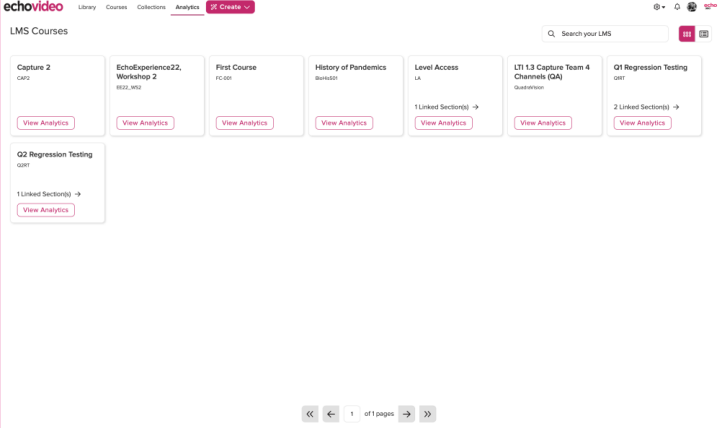
Each tile on the Analytics page corresponds with an LMS/VLE course in which you are an instructor. The newest semesters units are shown first.
The information on each tile includes:
- Name of the unit
- Semester/Term
- LMS unit identifier
- Echo section identifier IF the LMS course is linked to an Echo360 section.
- Total number of linked media. This appears in the banner at the bottom. It includes any Echo360 media that is embedded in the MyLO unit as well as any media in the Echo360 section if a section is linked.
Clicking ON a tile opens a new page with tabs for the media views and polling response data for the unit media. These tabs are described in more detail below.
Media Analytics - Views Tab
The Views tab is the one that appears when first opening the consolidated analytics page. The data included here, particularly the bar graph, will look familiar if you have ever looked at the analytics tab for the media details page to see media viewing data.
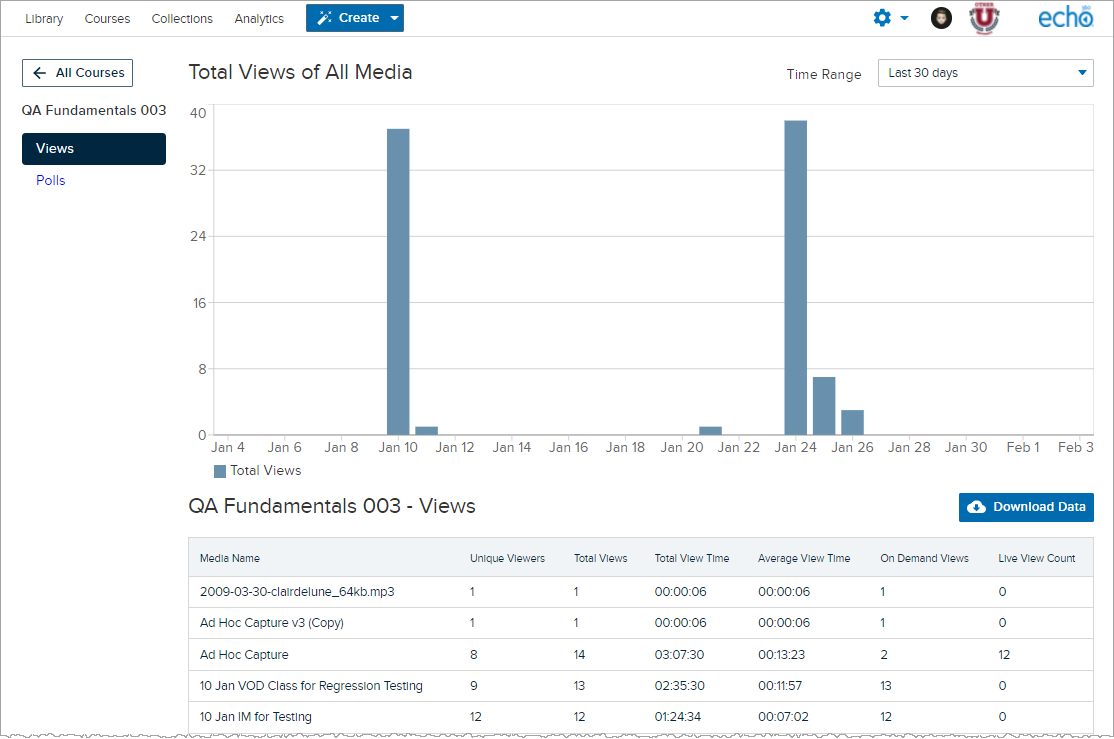
The Top Section of the page contains a bar graph, showing relative view counts by date.
The Time Range shown on the page by default is 30 days, but you can use the drop-down list located in the top-right corner to select a different range, including 7 days, 60 days, 90 days, or 12 months. NOTE that all of the data on the page is subject to the drop-down list, including the download; selecting different time frames changes both the graph AND the media list below the graph, and will change what data is included in the download.
The Bottom Section of the page lists all of the media associated with the MyLO unit that has any view data within the selected time range. This includes media you may have embedded into the unit itself AND all video/audio/interactive media that resides in any Echo360 section this unit is linked to. Media that has not been viewed or downloaded during the selected time range does not appear on the list.
Click ON any media link to open a page with more granular details for the selected item. See Detailed Media View Data later on this page for more information on what these details include.
Below the list you will find paging buttons, allowing you to page through the media list. Each page contains 25 media.
Media Views List
The media list on the Views page consists of audio, video, or interactive media only (no presentations). These media must have at least one view OR have been downloaded during the selected time range to appear on the list. Media listed may or may not have a view time shown if, for example, a user played for only a second or two, or downloaded the media without viewing it first.
By default, the media is listed in ascending order by creation date (oldest to newest).
Keep in mind that the data shown for each media may change based on the Time-Range selected, if views or downloads were executed at times that fall within different ranges (i.e., past 7 days vs. 30 days).
The data shown for each media in the list includes the following:
- Unique Viewers - The number of different users who have viewed this media within the selected time range.
- Total Views - The total number of views executed by all users within the selected time range.
- Total View Time - The total media viewing time by all users for this media in the selected time range.
- Average View Time - The average media viewing time for this media during each view; is calculated as total view time divided by total number of views.
- On-Demand Views - Number of times users viewed the processed video file (as opposed to a live stream)
- Live View Count - Number of times users clicked "view live stream" during the live stream (if applicable)
Detailed Media View Data
Each entry in the media list is an active link. Click ON a media link to open a page with more detailed information for the selected media. The Detailed view provides all user viewing details, for all users who have viewed or interacted with the media at any time.
The data on the media view details page is NOT subject to the time-range on the main page. That means you may click on a piece of media that shows 2 views in the main list, but open a page showing many more. This is because the 2 views in the main list occurred during the selected time range, but more views/downloads occurred outside of that time-range.
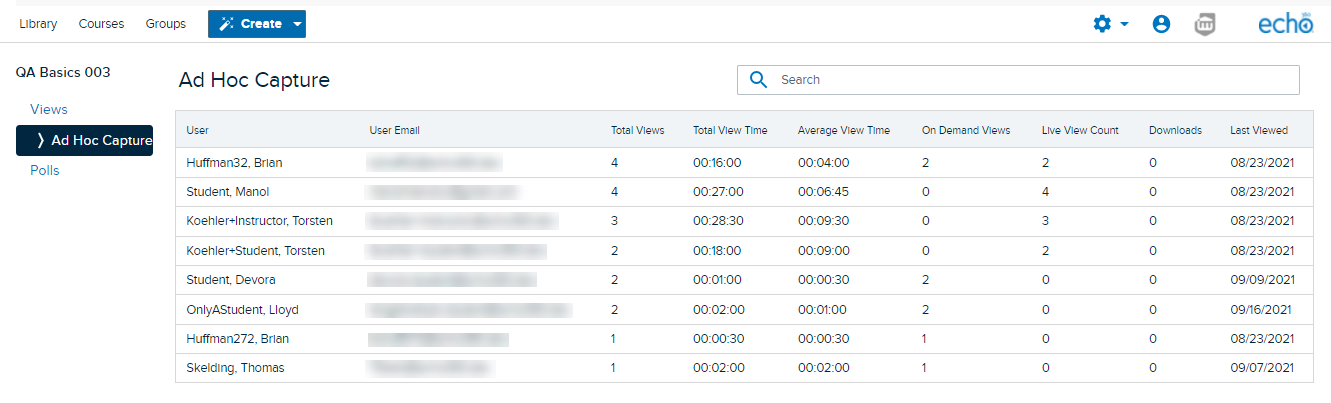
The data provided on the media views details for each user shown includes the following:
- Total Views - Total number of views logged by the user
- Total View Time - Total media viewing time for this user for this media
- Average View Time - Average media viewing time for this user for this media. This is calculated by taking the total view time and dividing it by total views.
If this media was originally broadcast as a live stream, this includes the time spent viewing the live stream. - On-Demand Views - Number of times this user viewed the processed video file (as opposed to a live stream)
- Live Views - Number of times this user clicked "view live stream" during the live stream
- Downloads - Number of times this user downloaded this media for offline viewing (if downloads are possible for this media)
- Last Viewed - The date this user last viewed this media. NOTE that this is in UTC or Universal Time Code and NOT "local time".
Media Analytics - Polls Tab
The Polls tab is available immediately below the Views tab on the left side on the page, and contains student polling response information for all poll questions in any presentations or interactive media associated with this unit. If you have viewed the Polling tab for an Echo360 course section to review student responses to polling questions, this page will look somewhat familiar to you.
The polling response data on this page includes all Echo360 section media, if the MyLO unit is linked to an Echo360 section (both presentations and interactive media), as well as any interactive media embedded directly into the unit.
When you first enter the page, the only thing shown is the polling Overview, that gives at-a-glance performance information regarding the polls in the unit-associated media.
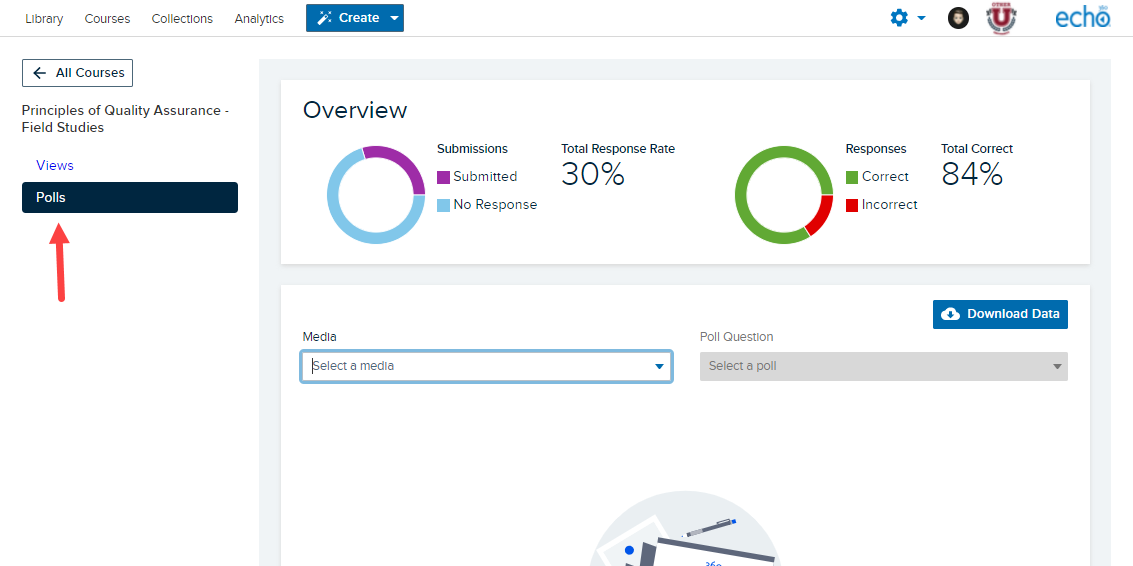
Total Response Rate is a percentage of POSSIBLE responses given to polls across all media. This is a calculation of number of students multiplied by the total number of polls in all media, then divided by the actual number of responses.
Total Correct is the percentage of correct vs incorrect responses given to polls across the course. The calculation ONLY takes into account polls that have a correct response identified.
Below the Overview you will find two drop-down lists.
The Media drop-down list allows you to select a particular presentation or interactive media to view polling responses for.
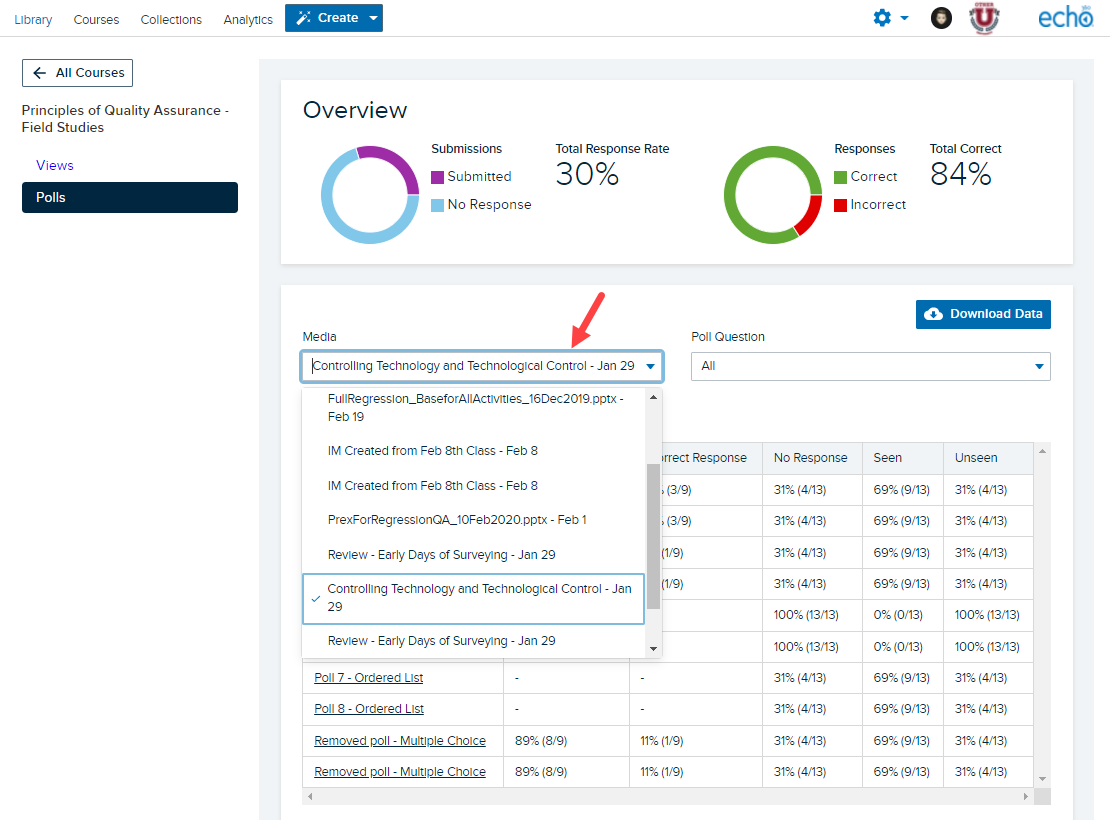
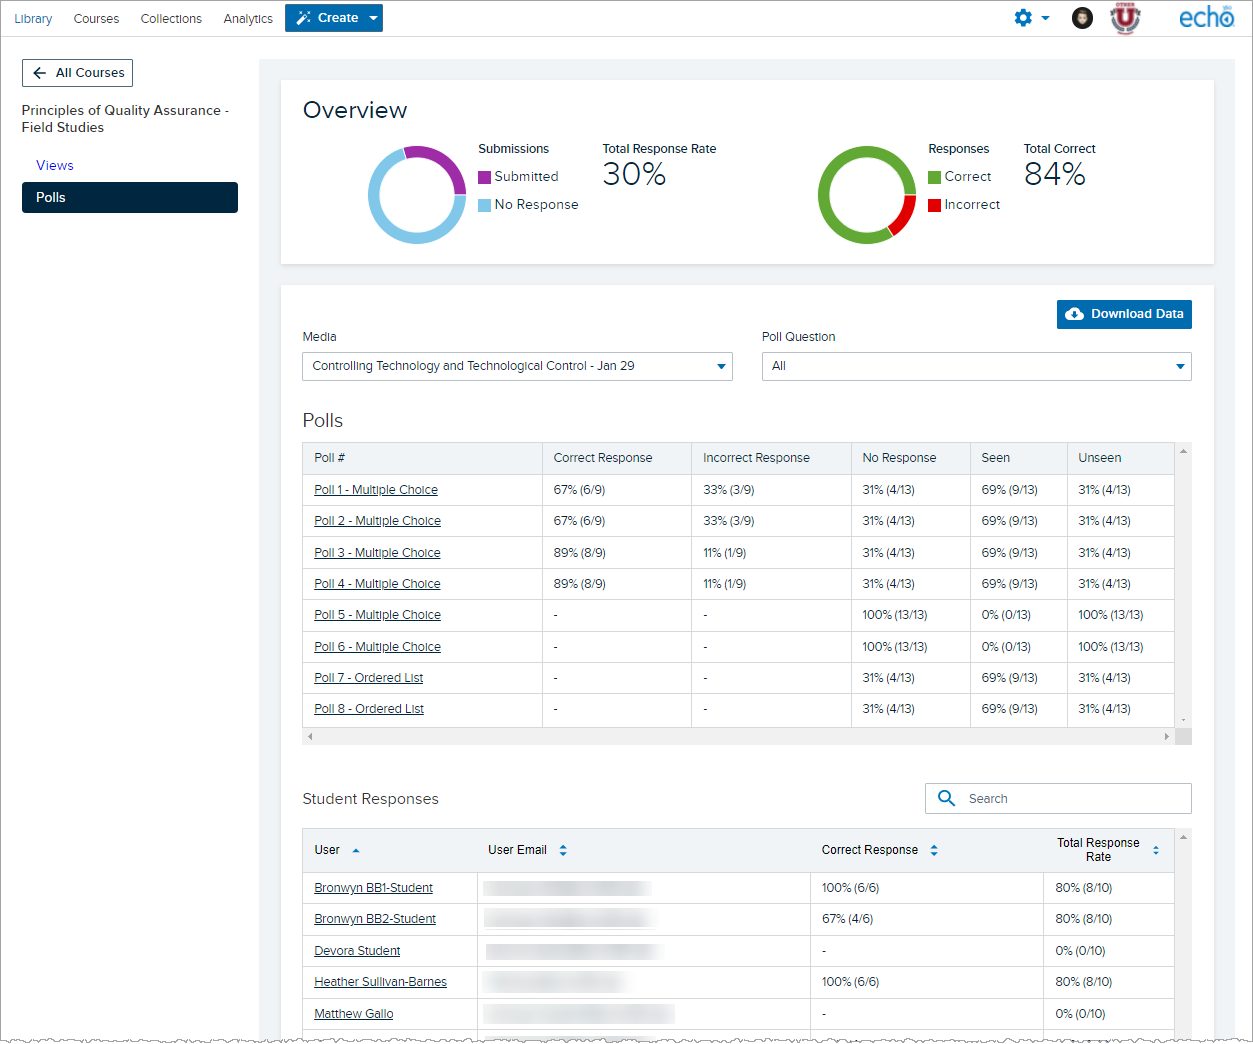
After selecting a piece of media, the lower part of the page changes to show overview information across all of the questions in the selected media.
The Poll Question drop-down list allows you to select a particular question in the selected media to view student responses.
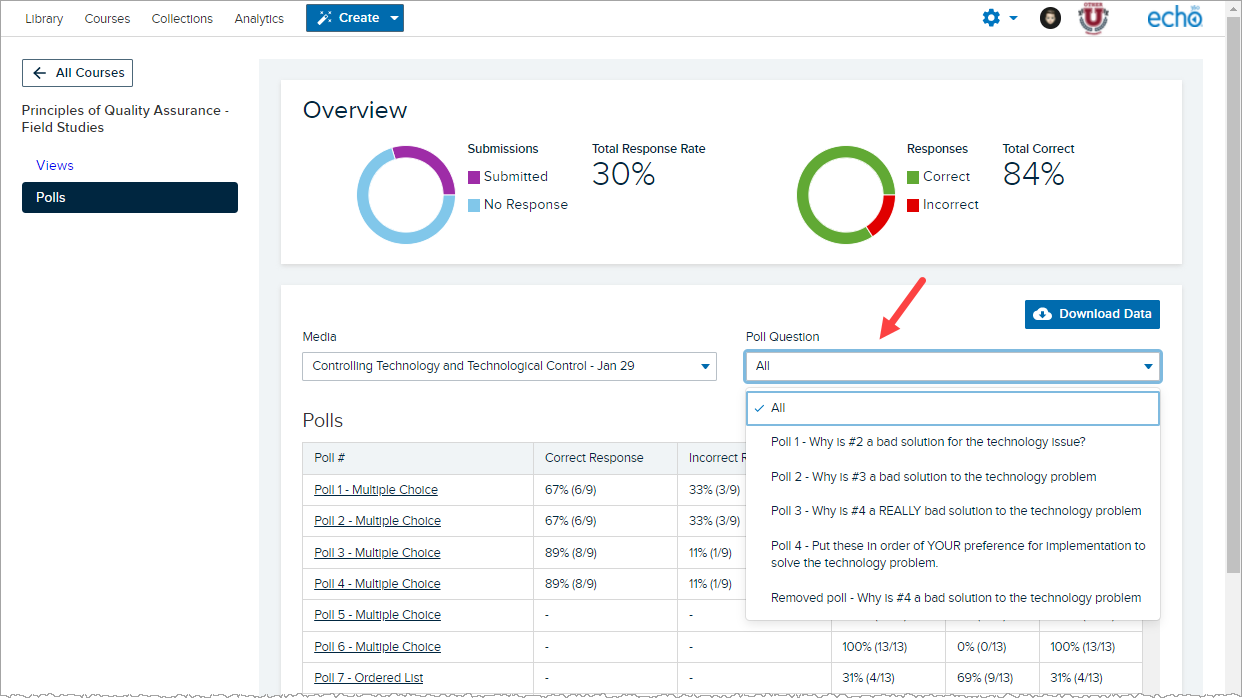
This page works exactly like the Polling tab for Echo360 unit sections, complete with links to popups for more information about any given poll question, and links to popups for more information on any given student's responses. See Viewing Responses to Polls in Echo360 Course Media for detailed instructions and information on each type of polling question if necessary.
Downloading Views and Polling Data
Both the Views tab and the Polls tab contain a Download Data button, shown in the figures on this page. Like all downloads from Echo360, the file downloaded is a comma-separated values (CSV) file, and can be opened as a flat file or in a spreadsheet program like Microsoft Excel or Apple Numbers.
Views Data Download
The Views data download, like all data on the Views page, is subject to the Time Range drop-down list. The downloaded file lists viewing details for each user who has viewed the media within the selected time frame.
The filename of the downloaded file includes the LMS/VLE course name and the date-range of the data, with start and end dates in UTC.
The data in the download is nearly identical to the download available from the media details page, with the exception that views of media by a single user from different locations (embedded in the unit and viewed within an Echo360 section) are not broken out into separate rows. Otherwise the data and fields provided are the same.
Polls Data Download
Unlike the Views data, the Polls data download is NOT limited by time-range. The Polls page and the downloads from the page include all polling responses for all polling questions in all interactive media or presentations associated with this unit.
The filename of the downloaded file includes the MyLO unit name and the date and time the file was generated (when you clicked Download Data) in LOCAL time.
The data in the download is nearly identical to the download available from the polling tab for an Echo360 course, with the exception that instead of Lesson Name, the download lists the MyLO unit name for each entry. Media is delineated by ID and media name.
Viewing Playlists
After logging into MyLO, when you first see an embedded playlist, the player shows a title bar, a playlist control bar, a playback control bar, and an overlaid Play icon, as shown in the figure below.
Playlist Controls
The playlist control bar, located at the left of the player, contains controls for playlist toggle, playlist video count, next, and back. The control bar and the title bar will fade out after 3 seconds (if none of the controls are in focus for keyboard access) and reappear with any mouse movement over the player.
The following figure highlights the controls on the left side, which are described below the figure, in the order in which they appear, from left to right:
Use the Playlist toggle to display a list of the videos in the playlist on the right side of your screen. When clicked, the playlist controls move to the right as shown in the figure below.
- The Playlist Video Count displays which video in the playlist you are currently viewing and the total number of videos in the playlist.
- Use the Back and Next buttons to skip to the previous or next video in the playlist.
H5P and Echo360
Videos from within Echo360 can now be used as sources within Interactive Video. To use this, you generate a H5P-specific video URL from within Echo360 and then add it when creating your H5P content.
To create a link access your Echo360 video via your library or collection. Select share:

You will have an option to create an H5P link. Select H5P Links and Create Link.

Copy the link and press Done.

Enter the link within your H5P Interactive Video:

Add your interactions as per normal and embed within your unit.

Echo360 and OneDrive Integration
The OneDrive Settings page allows you to "subscribe" to any of your OneDrive folders and SharePoint Sites. These subscriptions tell EchoVideo to copy any audio or video media added to those folders into your EchoVideo Library. This includes Teams meetings. Each OneDrive Subscription allows you to map the folder to an EchoVideo course section or your Echo video library.
Once you subscribe to a OneDrive folder, you can tell EchoVideo where you want the recordings or other video/audio media in the folder to go. ALL copied media goes to your Library; the EchoVideo mapping option simply allows you to also publish it to an EchoVideo section.
Keep in mind the following when subscribing EchoVideo to a OneDrive folder:
- Media is NOT automatically copied over until you subscribe to one or more folders.
- Only media that is written to the subscribed OneDrive folder AFTER you configure your subscription will be copied into EchoVideo; existing media is not automatically ingested.
- Being able to add a subscription will be determined by permissions. It is recommended that you create a brand new folder within OneDrive for this purpose.
Set up your OneDrive Folder:
Access your University OneDrive account.
Select My Files then Add new Folder.

Once created you can move onto adding your subscription between this folder and Echo360.

Set up your OneDrive Subscription:
Log into Echo360 and access your account settings.
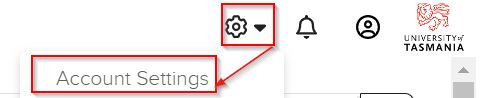
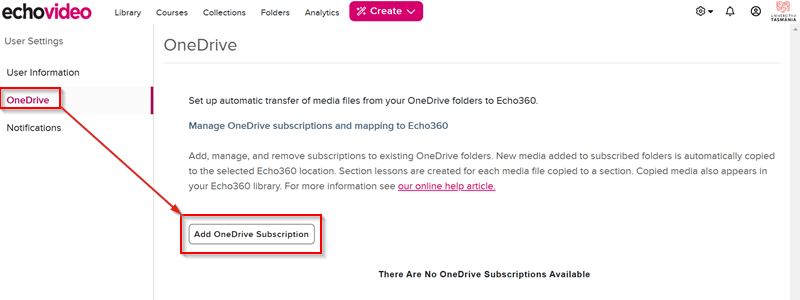
Select OneDrive from the left-hand menu and then press on the Add OneDrive Subscription. You may be asked to log into Microsoft if you are not already authenticated.
Select the folder or site you want to subscribe to, then click Next. In order to view the folder just created in OneDrive select My Files.

Select the sub-folder or Channel you want to subscribe to. Press Save.

Your subscriptions will appear in a list as per below:

Any new media files added to the subscribed sites/folders will be automatically copied into EchoVideo. Those media always appear in your EchoVideo Library. If mapped, they are also written to new classes created in the mapped EchoVideo course sections.
If you wish your videos to automatically go to an Echo Section that yourself and others have access too, put in a request for this purpose via the form: https://utas1.service-now.com/selfservice?id=sc_cat_item&sys_id=76b7bbd7db0eef406223147a3a9619cf
If when adding your folder you get an error like below, try once more to add the folder. If the error persists create a new folder in OneDrive to select. or add a piece of media to the folder you have already created and try again.

Reordering your Recordings in your Unit Section in Echo360
Instructors can change the order of the class list to show the Newest Classes first, reset the original Oldest Classes first order, or Drag-and-Drop classes into any order they choose. Students will see the classes in the newly-set order, although they can temporarily re-sort them chronologically if they want.
Reordering also allows you to drag existing classes into or out of a class group as needed.
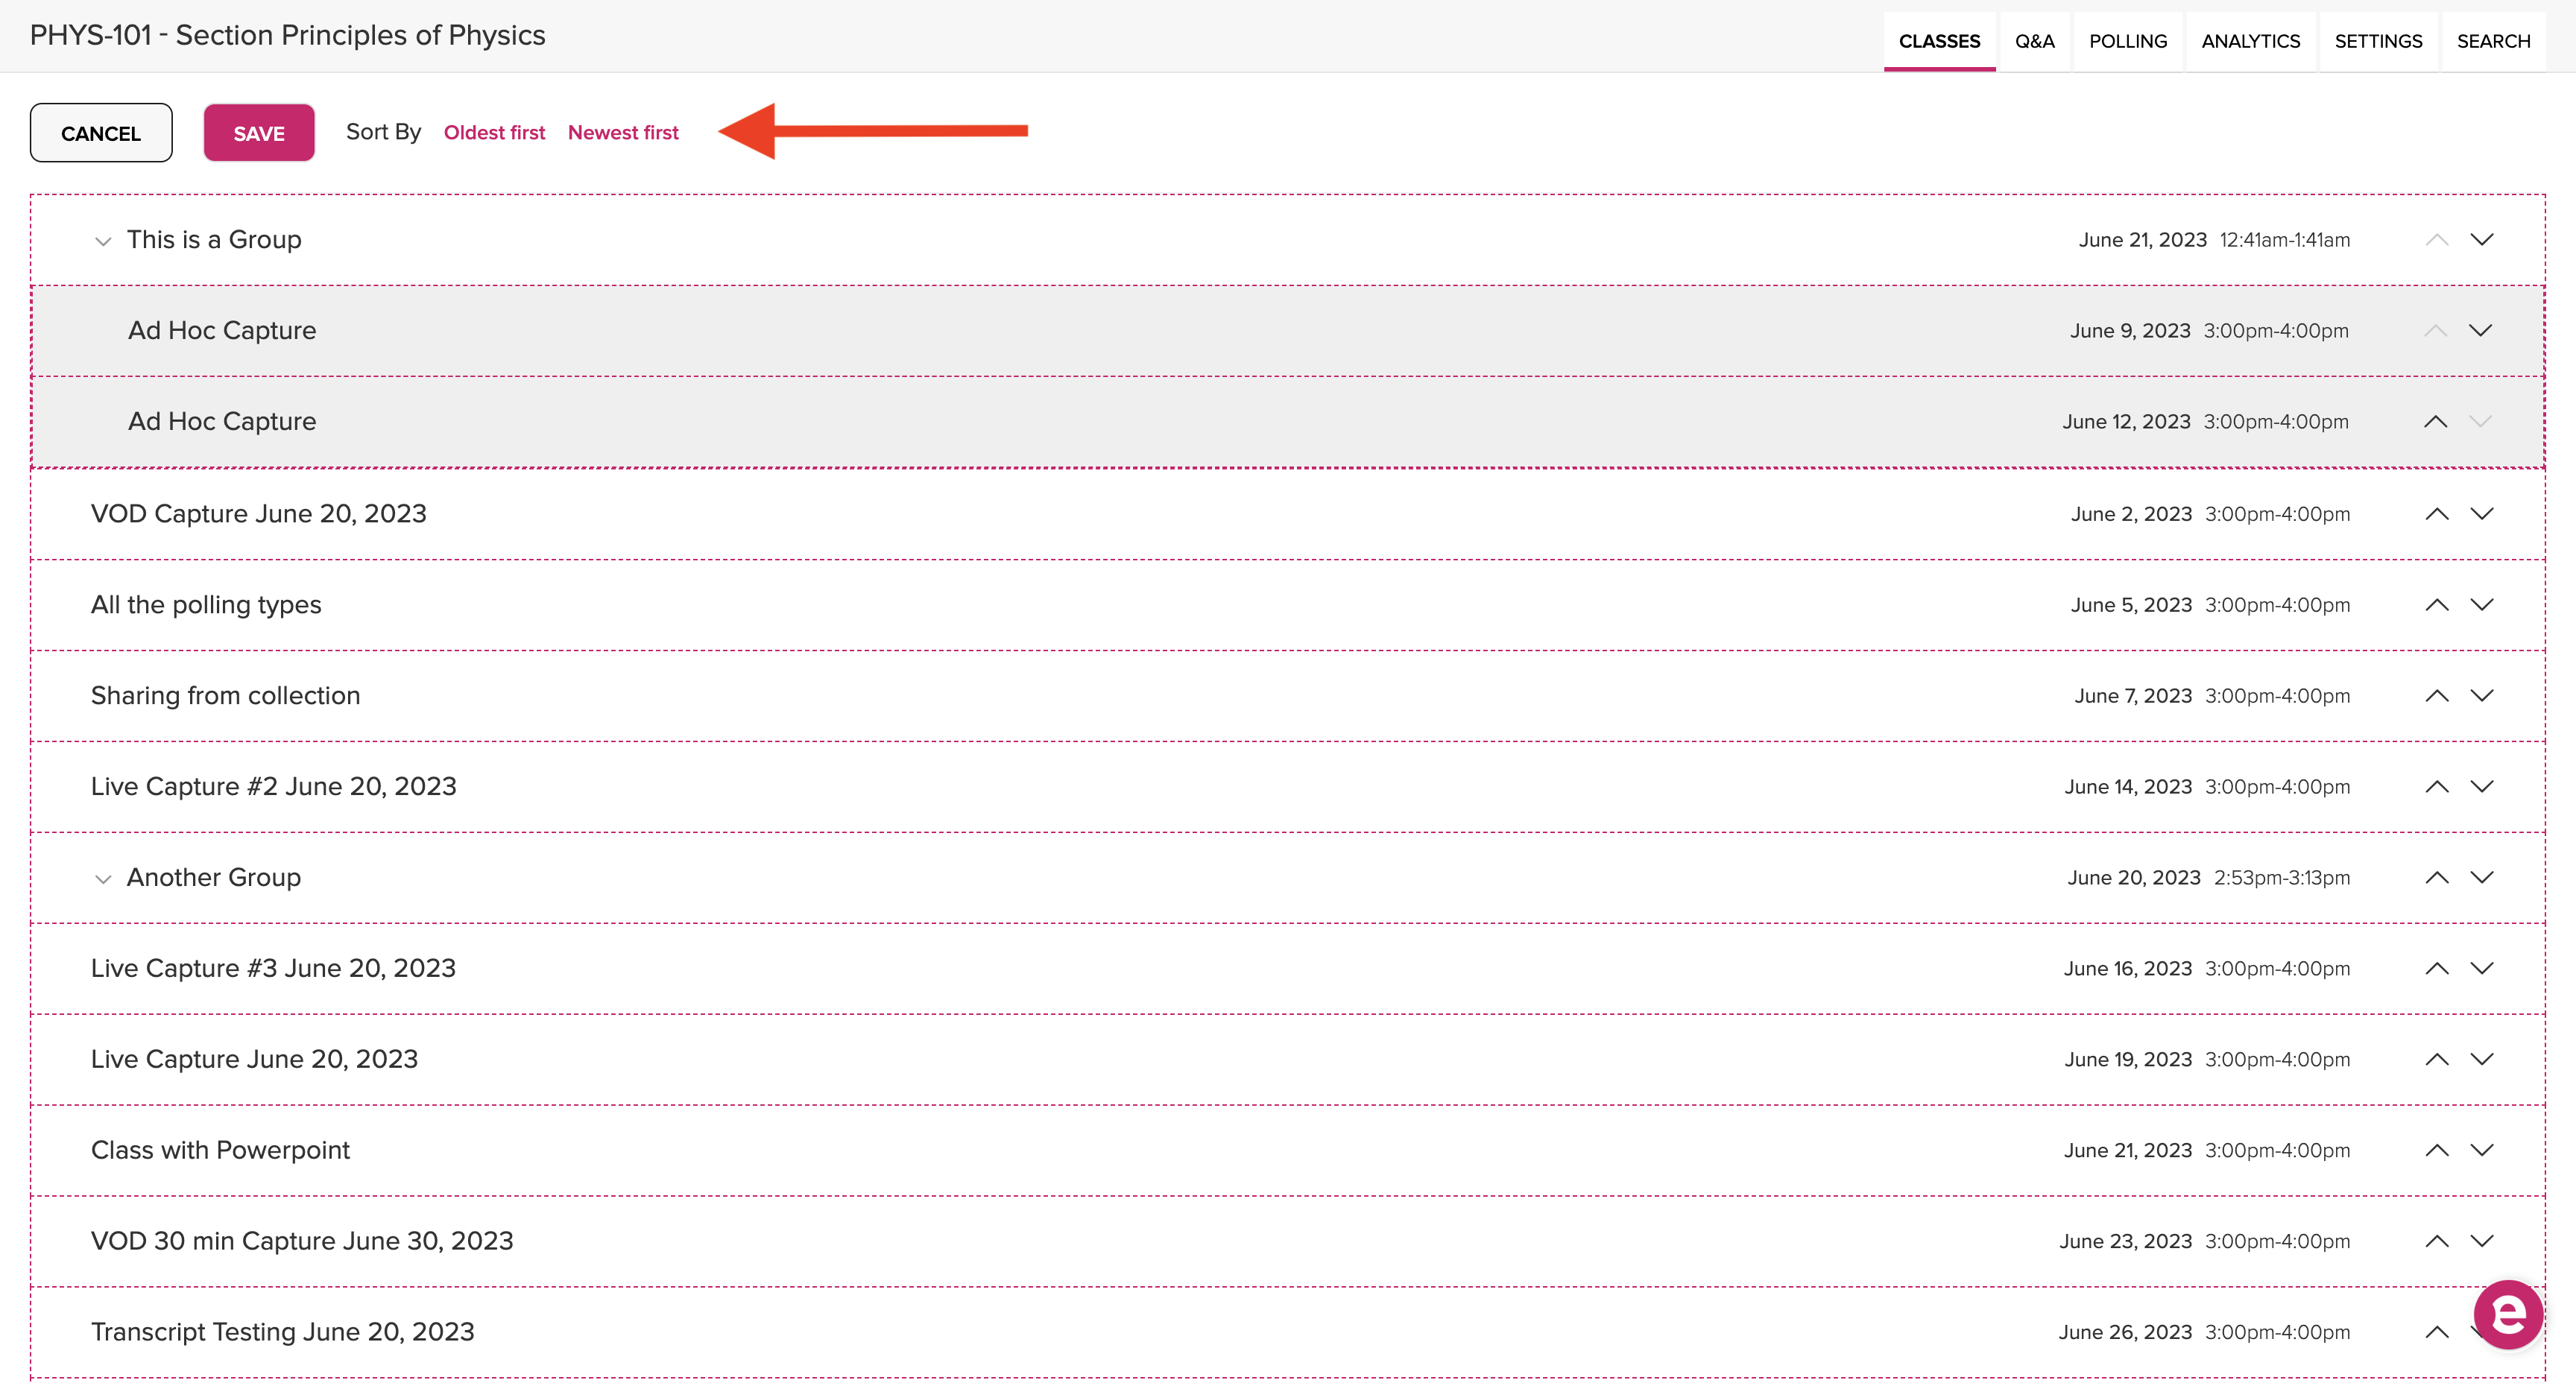
Basically, clicking the Reorder button puts the class list into "edit mode" allowing you to move classes up or down in the list, or to drag them into or out of a class group. The Newest first and Oldest first links at the top simply provide an easy way to sort the list chronologically by date.
To change the order of the class list OR to add/remove classes from a class group.
To change the order of the class list OR to add/remove classes from a class group
- Navigate to the class list for a section, either by clicking a Course tile on the Course tab or via a link in your LMS.
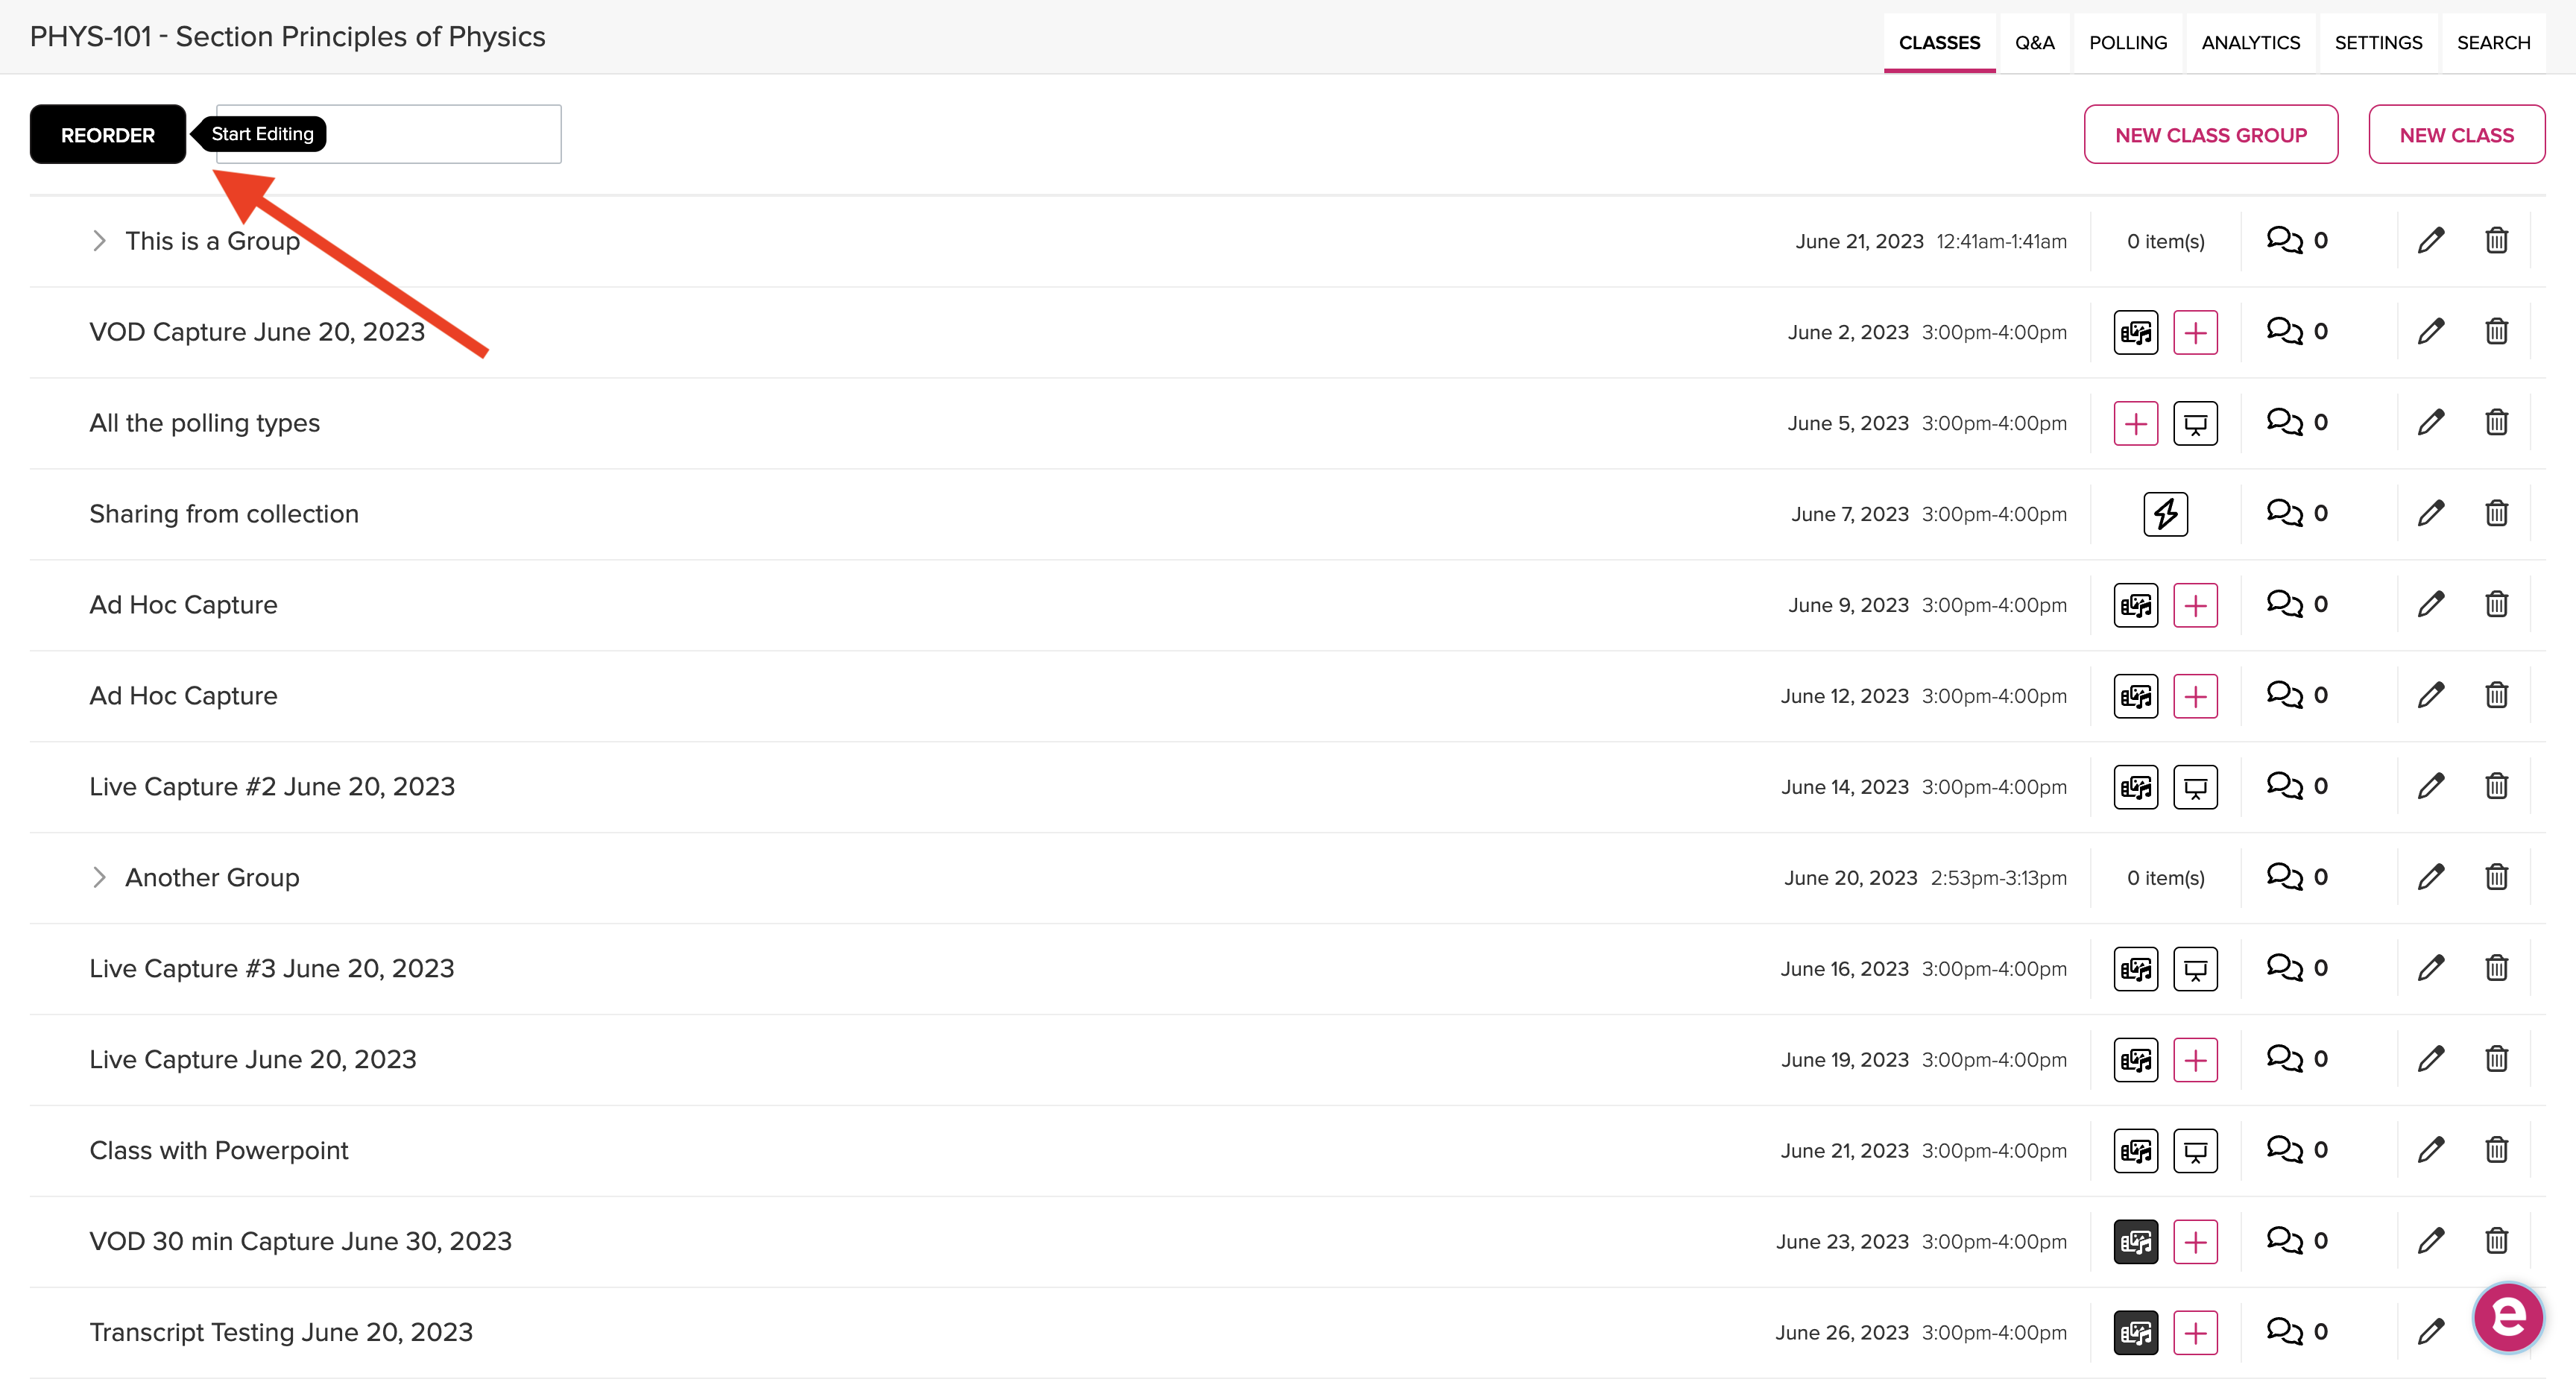
- Click Reorder located immediately above the class list on the left side.
- To sort the class list chronologically, click one of the Sort By Options. This INCLUDES sorting classes within any class groups chronologically as well. When sorting by Oldest first, all classes or class groups with no date/time appear at the top of the list; when sorting Newest first, those classes appear at the bottom.
- To manually move items to different locations, click and drag any class or class group to its new location in the class list.
ALTERNATELY, use the up/down arrows to the right of each class/class group to move that class/class group to a different location. If necessary, expand a class group to click-and-drag classes into or out of the class group. The below figure shows a class being dragged into an existing class group.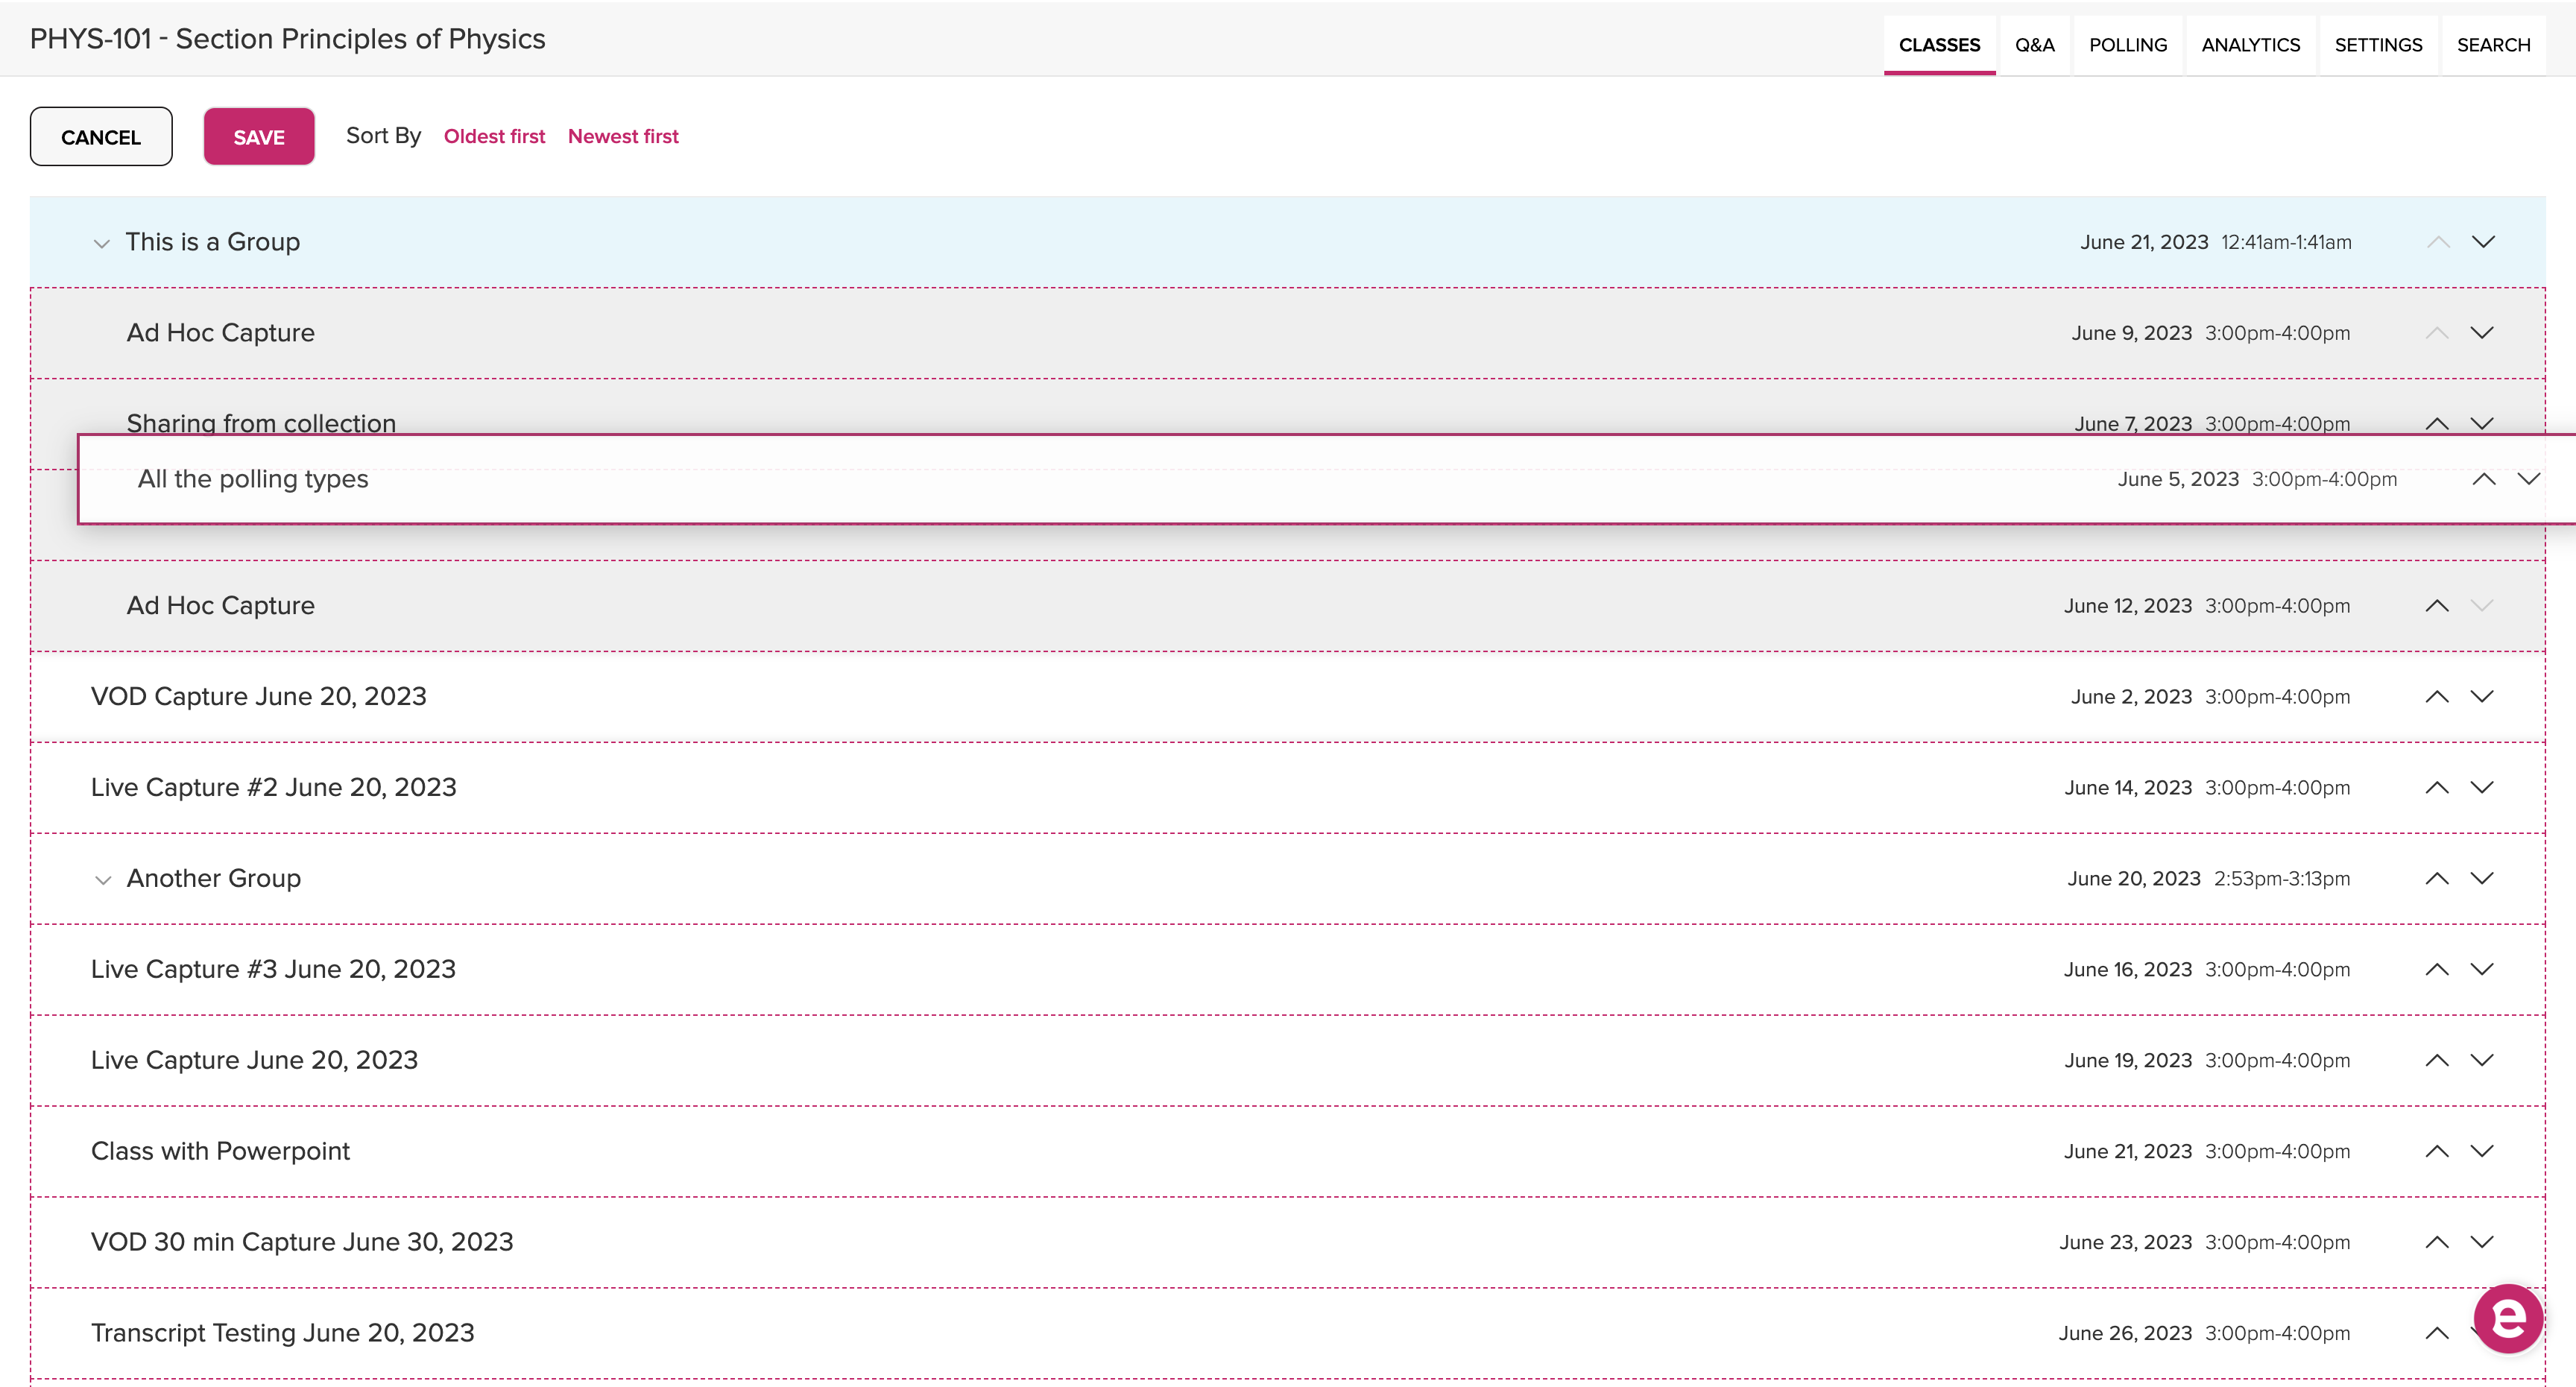
Echo360 Recycle Bin
EchoVideo offers a Recycle Bin where users can review and restore archived and soft-deleted content. You can always see and access the Trash tab to recover your deleted content. If your Institution Administrator has enabled a deletion policy, you can recover your soft-deleted content within the specified period, after which it will be permanently deleted. If no deletion policy is enabled, you can recover your soft-deleted content anytime.
Information on the Recycle Bin is here: https://support.echo360.com/hc/en-us/articles/16052246945037-EchoVideo-Recycle-Bin
Echo360 Spherical (360 Degree) Video
EchoVideo supports the upload and viewing of Spherical Videos (360° Video). A Spherical or 360° Video is media that has been captured with special hardware, in a specific format, that captures what is happening all around us. When playing, we can interact with the video to mimic the experience of being there. Currently, editing of Spherical (360°) Video is not supported.
Why 360° Video
360° Videos immerse the viewer in the captured media and allow them to experience it as if they were there. Playing back of 360° Videos can offer interactivity and spatial audio, resulting in more engagement from the viewer.
How does it work?
In the past, 360° Videos were experimental and hard to create. Technology advancements in digital cameras and digital video players has made it easier and more readily available for everyone to capture and reproduce 360° Videos.
360° Videos are captured by specialized cameras. Omnidirectional cameras are most commonly used to create this type of media. The lenses of the cameras are actively pointing everywhere. The lens has special optics to capture video in the shape of a sphere. This sphere is then mapped into a typical rectangular digital video projection.
360° Videos can also be captured by cameras that have an array of lenses. Cameras with an array of lenses capture the world in parallel on all of their lenses. The camera software then stitches everything together into a cubic or cube map projection. Other cameras put it in a spherical projection.
Creating 360˚ Media
There are several options to create 360˚ Media:
- Cameras that capture 360° Videos
- Mobile apps that capture 360˚ images
- Computer-generated images created with specific engines that create a 360° Video
EchoVideo currently supports cameras that capture 360° Videos.
NOTE that spherical video is currently unable to be captioned within EchoVideo.
For more information including suggested cameras go here: https://support.echo360.com/hc/en-us/articles/11076938363789-EchoVideo-Spherical-Video-360-Video